Overview
Get help with all the functions of the OnTime app from setup up to task completion.
- Getting Started
- Pick Function
- Put away Function
- Stocktake Function
- Adjustment Function
- How can I remove a task from a team member?
- What does the change bin option do?
- What happens when I click split?
- How can I enable item tracking?
Getting Started
Getting started with Wiise Warehouse OnTime is easy. There are only a few steps you will need to take to get you and your team set up.
-
Enable Wiise Warehouse OnTime on Wiise ERP Desktop
-
Before you get started with OnTime, you will need to enable the application within your Wiise Company.
-
-
Install the Wiise Warehouse OnTime app on Android and iOS
-
The OnTime app is available on iOS, Android and Android-based PDA handheld devices.
-
-
Add users to the Wiise Warehouse OnTime app
-
Set up your users to access the OnTime app and what functions you wish for them to access
-
-
Set up locations for Wiise Warehouse OnTime
-
Learn how to set up locations and bins correctly for OnTime.
-
-
Select either to post and save tasks on Wiise Warehouse OnTime
-
Set up the option for your workers to either post or save a task once they finish a task.
-
-
Navigate around the Wiise Warehouse OnTime app
-
Learn how to use the various screens, understand what happens once you start a task and the available scanning methods, what each box colour means, what is an urgent and completed task, how to filter and how to search
-
Pick function
Summary
Picking is the process where you select and gather items from their storage locations to fulfil customer orders or transfer orders.
The outbound order process
Here’s a level view of the outbound order process in Wiise:
-
Create the source document (Sales order, transfer order, purchase return order).
-
Release the source document
-
Create an Inventory Pick
-
Open the Wiise Warehouse OnTime app and select Inventory Pick
-
Select a pick from the list
-
Pick the items
-
Save or post the pick back to Wiise

The pick process on Wiise ERP Desktop
Creating the sales order
-
On Wiise desktop, select the search icon and enter Sales Orders.
-
Select New to create a new entry.
-
In the Customer field, enter the name of an existing customer.
The other fields on the Sales Order page will now be filled with standard information about the selected customer.
-
Fill in the remaining fields on the Sales Order page as necessary.
-
You are now ready to fill in the sales order lines with inventory items or services you want the customer to purchase.
-
On the Lines FastTab, in the Type field, select what type of product, charge, or transaction you will post to the customer on the sales line.
-
In the No. field, enter the number of an inventory item or service.
-
In the Quantity field, enter the number of items to be sold. The Line Amount field is updated to show the value in the Unit Price field multiplied by the number in the Quantity field.
-
In the Line Discount % field, enter a percentage if you want to grant the customer a discount on the product. The value in the Line Amount field is updated accordingly.
-
To add a comment about the order line that the customer can see on the printed sales order, write a comment on an empty line in the Description field.
-
To ship only part of the order quantity, enter that quantity in the Qty. to Ship field. The value automatically copies to the Qty. to Invoice field.
-
To invoice only part of the shipped quantity, enter that quantity in the Qty. to Invoice field. The quantity must be lower than the value in the Qty. to Ship field.
Releasing the sales order
-
You have now completed the sales order and it is ready to be released. This status indicates that the order is ready for the next stage of processing before it's posted.
-
Open the sales order. From the top menu bar, select the Release menu.
-
Select Release.
-
The document has now been released.
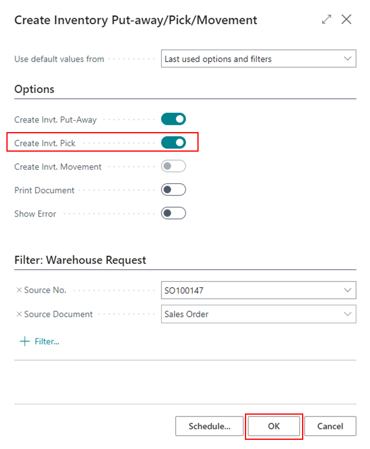
Creating the inventory pick
-
In Wiise Desktop, from the source document, select the Process menu.
-
Select Create Inventory Put-away/Pick.
-
On the Report Filter screen, ensure Create Invt. Pick is enabled.
-
Select OK.
-
This is now ready to be picked in the warehouse.
The Pick process in Wiise Warehouse OnTime
Complete a pick
-
On the Home Screen, select Inventory Pick. (You can also find this on the Functions page.)
The Inventory Pick screen displays a list of pick tasks that need to be completed. The list is sorted by the Shipping Date, with Inventory Picks having the earliest date at the top of the list.
-
Find your Inventory Pick in the list or by selecting the search Search icon. If there are many picks, you can also filter the list by Source Type or Destination Name.
See Navigating Wiise Warehouse OnTime for more on how to use the filter menu. -
Select the Inventory Pick you want to fulfil.
This will open the pick and check this out to you. Other users won't be able to work on this pick. If you open an Inventory Pick by accident or need to return it to the list to be worked on by another user, this can be done on the Wiise Desktop.
See How to remove a task from a team member in Wiise Warehouse OnTime for more information. -
Select an item in the list. You can do this by:
-
Selecting the item on the screen
-
Selecting the floating scan button and using an in-built camera
-
Using the trigger on a hardware device.
-
-
The item has now been selected on the pick list.
-
Go to the bin shown in the Bin Code on the item card.
If the bin shown is not accessible, or if you can’t pick the item from the specified bin, you can change the bin.
-
Pick the item from the bin.
-
Verify that the Item Number, Item Description, Variant Code (if applicable) and UOM (Unit of Measure) of the picked item match what is displayed on the screen.
-
Select Scan Item to scan with the device camera or the barcode scanner.
-
Point the device at the barcode of the item.
-
If the item scanned matches the item on the Pick Item screen, you will see a quantity selector.
-
Use the + and - buttons to update the Picked quantity or tap the Max button to pick the full quantity required.
If you are unable to pick all items from the specified Bin, you may need to split the line. For more information on how to split a line see How to split a line using Wiise Warehouse OnTime. -
Once the required quantity has been reached, you will see the message ‘Item Complete’ and a Next button is displayed at the bottom of the screen.
-
Click Next to confirm that this item has been picked and move to the next item. Repeat steps the above steps until all Pick Items are complete.
-
When the last item has been picked, you will see a prompt confirming that the Pick is complete. You now have the option to either Post or Save, depending on your configuration,
-
Select Post to post the pick.
This will complete the Inventory Pick process in Wiise and the Pick will no longer be visible on your device. Only staff with a full Wiise licence will be able to post the pick.
-
Select Save to save the Pick back to Wiise Desktop. The Pick will remain on your device in the Completed tab until it is posted from the Wiise desktop.
-
-
Congratulations! You have now completed an Inventory Pick.
What happens once I save or post a pick back to Wiise ERP Desktop?
Now that the task has been completed, it has been either posted or saved back to Wiise ERP Desktop.
If it has been posted:
-
The Quantity to Handle field in the tasks document has been updated to the expected number.
-
The posted command has been run.
-
The document has been moved to the Posted Inventory Pick Page.
-
The inventory amount has been updated.
-
If you have posted a partially complete pick, only the amount that has been completed will be posted back to Wiise ERP desktop.
-
For example, if a user picks 7 out of 10 items, 7 will post and the 3 will remain unposted until completed.
-
If it has been saved:
-
The Quantity to Handle field in the pick tasks document has been updated to the expected number.
-
All item tracking details have been saved back to the document.
-
The document can now be confirmed and posted from Wiise ERP Desktop.
What happens if I have partially completed a pick?
Depending on your setting, one of two things may happen. If you have posted the partially completed pick, anyone can complete the remainder of the pick. If you have saved it, only the same user who started the task may complete it. You can unassign the task in case a different staff member may need to complete the task. Read up on how to remove a task here: How to remove a task from a team member in Wiise Warehouse OnTime
Put away function
Summary
A put away is the process of organising and placing incoming inventory into their designated storage locations within the warehouse.
The inbound order process
-
Create source document (Purchase Order, Transfer Order etc)
-
Release source document
-
Create Inventory Put away
-
Open the OnTime app and select Inventory Put away
-
Select a put away from the list
-
Put the items away
-
Save or Post the put away back to Wiise

The put away process on Wiise ERP Desktop
Creating the document
A put away can be created from the following source documents:
Releasing the document
-
You have now completed one of the put away source documents and are ready to release. This status indicates that the put away is prepared for the next stage of processing before it's posted.
-
Open the sales order. From the top menu bar, select the Release menu.
-
Select Release.
-
The document has now been released.
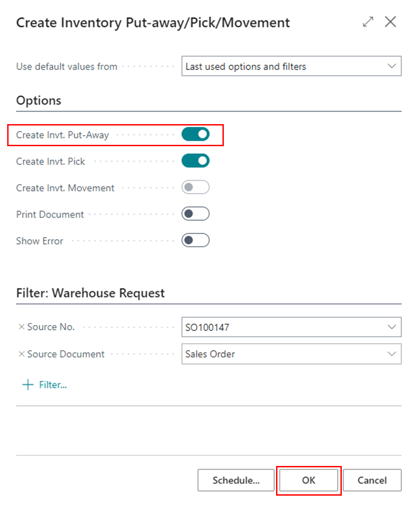
Creating the inventory pick
-
From the source document, select the Process menu
-
Select Create Inventory Put-away/Pick
-
On the Report Filter screen, ensure Create Invt. Out-away is enabled
-
Select OK.
The put away process in Wiise Warehouse OnTime
Complete a put away
-
From the Home Screen, select Inventory Put Away. (You can also find this on the Functions page.)
The Inventory Put Away screen displays a list of Put Away tasks that need to be completed. This list is sorted by the Expected Receipt Date, with Inventory Put Aways having the earliest date at the top of the list.
You can find a specific Inventory Put Away by selecting the Search icon. If there are many picks, you can also apply a filter to the list to only show Inventory Put aways based on the selected criteria such as Source Type or Origin Name.
-
Select the Inventory Put Away tile you would like to action.
The Put away is opened and checked it out to you. Other team members won't be able to work on this put away. If you open an Inventory Put away by accident, or need to return it to the list to be worked on by another user, this can be done on the Wiise Desktop. See How to remove a task from a team member in Wiise Warehouse OnTime for more information.
-
Verify that the Inventory Put away displayed on the screen matches the Origin Name (eg Vendor Name or Transfer from Location name).
-
Check that the Expected Receipt Date of the inbound order and the list of items and the quantity expected match what has been received.
-
Tap on an item in the list to select it, or scan the barcode on an item by tapping on the floating scan button or using a scanner. You will now see the page of the item to be put away.
-
Verify that the Put away Item screen displays the correct Item Number, Item Description, Variant Code (if applicable), Weight and Unit of Measure (UOM) of the item you are putting away.
-
You will also see the Bin Code that has been assigned to this item.
If the displayed bin is not accessible, or if you are unable to place the item in the specified bin, you can select Change to view a list of alternate Bin Codes. For more information on how to change the bin code see How to change a bin using Wiise Warehouse OnTime.
-
Select Scan bin to scan the bin code with the device camera, or activate the inbuilt barcode scanner.
-
Point the device at the barcode of the bin.
If the Bin Code scanned matches the assigned bin on screen, you will see the quantity selector and a confirmation message ‘Bin scanned’. (To reduce the risk of putting an item away in an incorrect location, OnTime requires that you scan the bin code to confirm the correct location in the warehouse.)
-
Use the + and - buttons to set the Put away quantity.
If you are unable to place all items into the specified bin, you may need to split the line. For more information on how to split a line, see How to split a line using Wiise Warehouse OnTime.
-
Once you have entered enough items to complete the put away, you will see the message ‘Item Complete’ and a Confirm button is displayed at the bottom of the screen.
-
Click Confirm.
-
You will then return to the Put away item list. Repeat steps 4-10 until all Put Away Items are complete.
-
When the last item has been put away, you will see a prompt confirming that the Put away is complete. You now have the option to either Post or Save, depending on your configuration,
-
Select Post to Post the Put away.
This will complete the Inventory Put away process in Wiise and the Put away will no longer be visible on your device. Only team members with full permissions and licences will be able to do this.
-
Select Save to save the Put away back to Wiise.
The Put away will remain on your device in the Completed tab until it is posted from Wiise desktop. All team members should be able to do this action.
-
-
Congratulations! You have now completed an Inventory Put away.
What happens once I save or post a put away back to Wiise ERP Desktop?
Now that the task has been completed, it has been either posted or saved back to Wiise ERP Desktop.
If it has been posted:
-
The Quantity to Handle field in the tasks document has been updated to the expected number.
-
The posted command has been run.
-
The document has been moved to the Posted Inventory Put Away Page.
-
The inventory amount has been updated.
-
If you have posted a partially complete put away, only the amount that has been completed will be posted back to Wiise ERP desktop.
-
For example, if a user picks 7 out of 10 items, 7 will post and the 3 will remain unposted until completed.
-
If it has been saved:
-
The Quantity to Handle field in the put away tasks document has been updated to the expected number.
-
The document can now be confirmed and posted from Wiise ERP Desktop.
What happens if I have partially completed a put away?
Depending on your setting, one of two things may happen. If you have posted the partially completed put away, anyone can complete the remainder of the pick. If you have saved it, only the same user who started the task may complete it. You can unassign the task in case a different staff member may need to complete the task. Read up on how to remove a task here: How to remove a task from a team member in Wiise Warehouse OnTime
Stocktake function
Summary
A stocktake is a process of physically counting and verifying the quantity of inventory in a warehouse. Completing stocktakes is crucial for maintaining accurate inventory records, identifying discrepancies, preventing stockouts or overstocking, and optimising business operations.
The stocktake process
-
Create a Physical Inventory Order in Wiise Desktop
-
Click on New Device Recording
-
Open the OnTime app and select Stocktake
-
Select a Stocktake Recording from the list
-
Count the items
-
Save the Stocktake Recording back to Wiise

The stocktake process on Wiise ERP Desktop
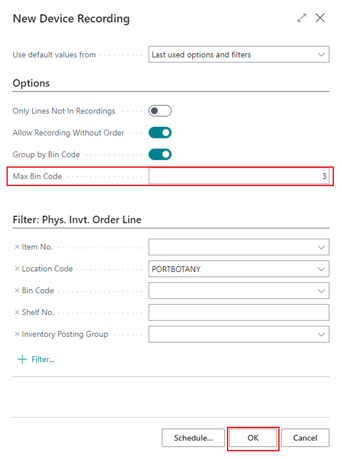
Creating a stocktake
-
From the Physical Inventory Order, select the Home menu
-
Select New Device Recording…
-
On the report filter screen, specify the number of bins that each Stocktake Recording should contain in the Max Bin Code.
-
Applying any filters that may be required, ie Location Code.
-
Select OK.
The stocktake process in Wiise Warehouse OnTime
Completing a stocktake
-
On the Home Screen, select Stocktake. (You can also find this on the Functions page.)
-
You will now see a list of Bin Codes.
The Bin Code reflects the first bin code that is contained within each Stocktake Recording. The list is sorted alphabetically.
-
Select the stocktake you would like to complete.
This will open the stocktake and check it out to you. Other users won't be able to work on it. If you open a stocktake by accident or need to return this to the list to be worked on by another user, this can be done on the Wiise Desktop. Read more here: How to remove a task from a team member in Wiise Warehouse OnTime.
-
You will now have an item list containing bins and items.
This may be just for one bin, or it may reflect items contained within a number of bins, depending on how the Stocktake Recording was set up.
-
Select an item tile from the list and go to the correct bin. (You can also scan the barcode on an item to open directly to the item count screen.)
-
Count the physical quantity of that item contained within the bin.
-
Use the keypad to enter your count of the items. (You can also use the + or - buttons to adjust the count.)
-
Select anywhere on the screen to exit the keyboard.
-
Select Confirm button to confirm the count.
-
Repeat steps 5-7 until all of the items have been counted and the Completed tab is displayed.
-
Select Back to return to the stocktake list.
-
Select Save to save all completed stocktakes back to Wiise Desktop, or select a new stocktake to continue counting.
-
Congratulations! You have now completed a stocktake.
Can I complete more than one stocktake before sending it?
You do not need to save after completing each count. This may be useful if you are counting in an area that does not have strong reception.
When you have completed the required stocktakes, return to the stocktake list and tap Save.
What happens once I save a stocktake back to Wiise ERP Desktop?
Now that the task has been completed, it has been saved back to Wiise ERP Desktop.
-
On the Physical Inventory Recording, the quantity field and recorded field has been filled in.
-
The complete stocktake has been removed from the to-do list.
-
The stocktake can be completed in Wiise:
-
Search for and open Phys. Inventory Recordings.
-
Select the completed stocktake from the list.
-
Review the stocktake and confirm it is correct.
-
Select Finish in the top menu bar when ready.
-
Select Yes in the pop-up to finish the recording.
-
The stocktake has now been completed.
Adjustment function
Summary
Adjustments are increases and decrease’s made to inventory to match an item's actual on-hand quantity.
The adjustment process
-
The inventory stock is found to be incorrect.
This could be from a stocktake count, broken or destroyed items, e.g. -
Open the Wiise Warehouse OnTime app.
-
Select adjustment.
-
Create a new positive or negative adjustment with the item.
-
Save the adjustment back to wiise.
The adjustment process on Wiise ERP Desktop
There are three possible ways to complete an adjustment on Wiise ERP Desktop
The item card
-
Open Wiise ERP Desktop. Select the search icon and enter Items.
-
Select the item for which you want to adjust inventory, and then choose the Adjust Inventory action.
-
In the New Inventory field for the location, enter the result of the count.
-
Choose the OK button.
Item Journal
-
Open Wiise ERP Desktop. Select the search icon and enter Item Journals.
-
Select ITEM from the Item Journal Template List.
-
On the Lines, select either Positive Adjmt or Negative Adjmt
-
Enter in the item number under the Item No field.
-
Choose the Post action to adjust the quantities.
The adjustment process in Wiise Warehouse OnTime
Complete an adjustment
-
In the OnTime app, open the Functions page.
-
Select Adjust.
-
Select + New adjustment.
-
Select Scan Item to scan the barcode of the item with the device camera or scanning device.
Alternatively, select Search item and enter the Item Number or Barcode of the item then select the Search icon to find the item.
-
Select Scan bin to scan the barcode of the bin that the items are in.
Alternatively, select Select bin code and the bin the item is in then select the Save button.
-
The item has now been selected.
You will see the item's information on the top half of your screen. The bin of the item can be changed by selecting the Change button next to the bin code.
What happens once I save or post an adjustment back to Wiise ERP Desktop?
Now that the task has been completed, it has been either posted or saved back to Wiise ERP Desktop.
If it has been posted:
-
The adjustment has been posted to the item journal batch that is specified on the user card.
-
No further steps are needed on Wiise Desktop and the item quantity has been adjusted.
If it has been saved:
-
A journal line has been created in the item journal batch that is assigned to the staffs user card.
-
No inventory will be updated till it has been posted from the item journal batch
-
Here is how to post the item journal batch
-
Search for and open item journals.
-
Select the WH-ITEM item journal batch from the list.
-
Select the drop-down on Batch name in the top right corner.
-
Select the User ID batch that added the adjustment.
-
Review the adjustments on the journal lines.
-
Select the Post drop down then select post or post and print.
-
The adjustment is now complete.
-
Now that the journal line has been posted, the inventory is adjusted is the new quantity.
How can I remove a task from a team member?
When a team member selects a task in Wiise Warehouse OnTime, that task is automatically assigned to them so that it can not be worked on by anyone else.
If they select a task by mistake or are unable to complete the task, the task will need to be removed from them so that another team member can complete it.
Follow the steps here to remove a task from a team member: How to remove a task from a team member in Wiise Warehouse OnTime
What does the change bin option do?
When using inventory pick and put away, if a bin is not accessible or you can’t take or place the required quantity within the specified bin you can change the Bin Code.
Follow the steps here to change a bin: How to change a bin using Wiise Warehouse OnTime
What happens when I click split?
When using inventory pick and put away, if the full quantity is not available from the bin that is assigned you can split the line so that the required quantity can be taken from or (placed in) two or more bins.
Follow the steps here to split a line: How to split a line using Wiise Warehouse OnTime
How can I enable item tracking?
Item tracking allows you to track and trace items as they move throughout the warehouse directly while completing tasks using OnTime. This gives your warehouse companies clear insights into item purchase forecasting, real-time inventory updates, where items are stored, and where the item is heading next. You can track items based on serial numbers, LOT numbers, and package numbers, providing you with control and visibility over your warehouse inventory.
Follow these steps to set up item tracking in Wiise: Set Up Item Tracking with Serial, Lot, and Package Numbers
Follow these steps to apply tracking codes to an item: How to apply tracking codes to an item
Follow these steps to enable item tracking in Wiise Warehouse OnTime: Enable item tracking in Wiise Warehouse OnTime