Overview:
- Learn how to navigate the Wiise Warehouse OnTime app.
- Learn about the home page, functions, and settings.
Home page
What’s on the home page?
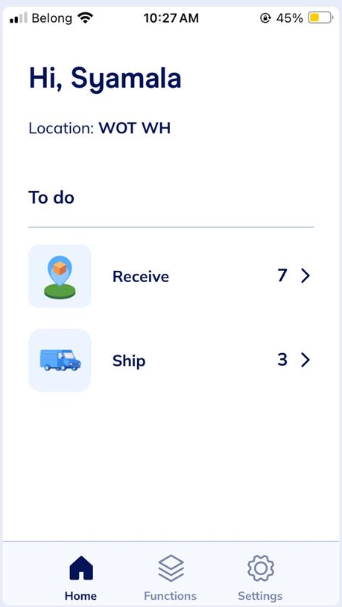
- Home Page: The home page is the first screen you see when you open the OnTime app. It displays all your tasks, including a separate list for urgent, high-priority items.
- Name and Location: The home page features your details along with the location you’re in.
- To do list: The To-Do list shows all available tasks. The number on the right indicates how many tasks are either unopened or assigned to you.
- Priority tasks list: The priority task list appears on the Home Page when you have high priority tasks assigned to you. It helps you organise urgent tasks due today or tomorrow, including both shipments and expected receipts. It highlights tasks that are urgent, not started, or overdue.

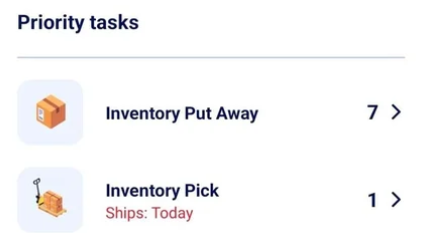
Note: The priority tasks are indicated with an expected date highlighted in red text. These are the tasks that need to be completed either today or tomorrow. The number to the right of each process shows how many tasks require to be completed.
Settings

What’s on the settings page?
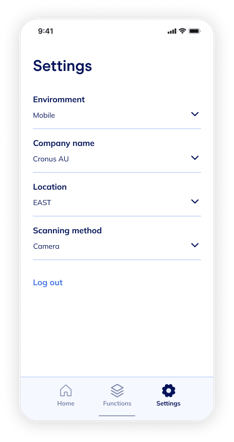 The settings page allows you to adjust settings for the environment, company, location, and scanning method, ensuring the app works for your selected company, location and scanning method. Each heading has a drop-down menu. Select a menu to show options based on your Wiise setup, as well as choices for your scanning method.
What does each setting page menu do?
Environment
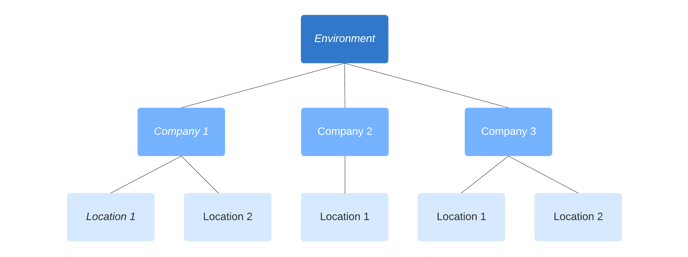
Environments in Wiise are separate instances of the software that allow your business to manage different entities or divisions. A production environment is where all the real business activities would be recorded, and a sandbox environment is where you’d be conducting all your test transactions.
Note: You can have more than one production and sandbox environments. Your systems administrators will provide appropriate access.
After selecting the environment, the company field will display the available companies within it. You can switch environments without signing out.
Company Name
The company name drop-down displays all companies available within the environment.
The companies in the drop-down will be shown depending on the environment selected. Some businesses may have multiple companies within the same environment, its important that you select the correct company. If you are working across different business entities, you can change the company you’re using without signing out, provided you have the appropriate access.
Location
The OnTime app shows you locations set up on Wiise ERP desktop under the company you have already selected above. When you select a location, you’ll only see information relating to that location in the app. You can change your location without signing out.
Note: You’ll need to be set up as a warehouse employee for each location you need to use.
Scanning Method
The scanning method relates to your preferred way of scanning barcodes. You have two options:
- Camera: This will use the integrated camera on your device.
- Hardware scanner: This will use the laser or scanning device connected to your device. This may be an Android scanner or Bluetooth laser.
Note: You can scan on most pages in the Wiise Warehouse OnTime app. You'll see this scan button on the OnTime app:
![]()
Functions

What’s on the Functions page?
The functions page in the OnTime app displays every warehouse function available to you.
The functions page displays the following under each type of process:
- Inbound
- Put-away: The process of moving received goods to their designated storage locations in the warehouse
- Receive: The process of accepting and verifying incoming goods before they are stored or put away in the warehouse
- Outbound
- Pick: Involves retrieving items from storage to fulfil orders or internal requests.
- Ship: The process of picking, packing, and dispatching goods from the warehouse to fulfil customer orders or internal transfers
- Internal
- Stocktake: the process of physically counting and verifying the inventory in a warehouse to ensure it matches the records in the system
- Adjust: the process of updating inventory records to reflect changes in stock levels due to discrepancies, damage, or other unforeseen factors
- Assemble: the process of combining multiple components or items to create a finished product or kit ready for shipment or use.
- Move: involves relocating inventory within the facility, such as transferring items from one storage location to another to optimise space or prepare for picking and shipping.
- Look Up: the process of searching for specific inventory information, such as item location, quantity, or details.
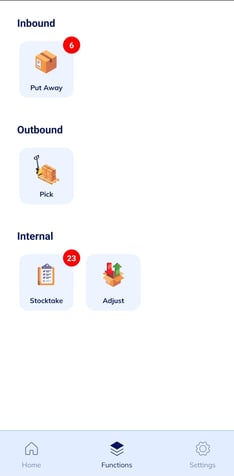
Note: The red circles with numbers on the right corner of the functions indicate how many are currently in the To Do list of the functions.
You’ll need to select the appropriate settings on the location card that works for the type of warehouse your business operates.
Start a task
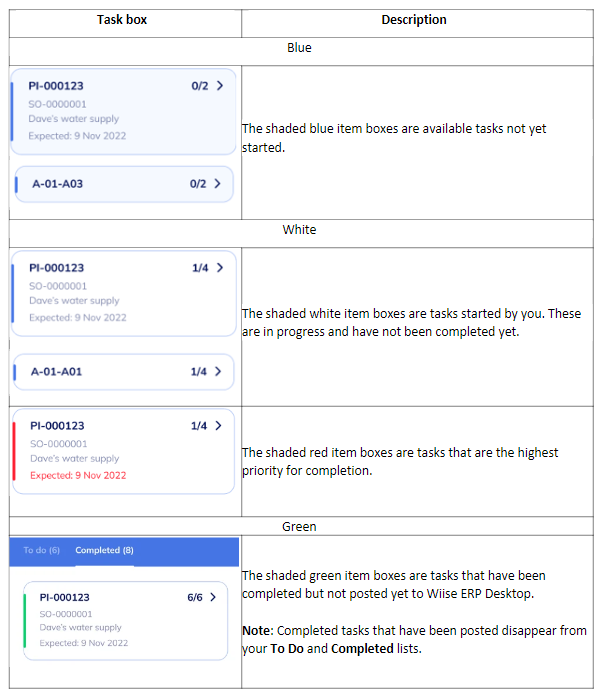
When you start a task from an available function, you’ll be auto assigned the task to completion. This action prevents other warehouse workers from making any changes to the task. Tasks are colour coded.
What do the tasks colours mean?
Note: When you’re unable to complete the task, you’ll need to request your warehouse manager to remove the task for a team member on the Wiise ERP desktop.
Find out how a task can be reassigned to another worker through the OnTime app.
Note: Based on your user permissions, when you complete a task in OnTime, you can either save, post, or register the task. Saving sends the task details back to Wiise ERP Desktop for another user to complete. Posting a task directly updates the details in Wiise ERP Desktop, potentially moving the task to the next stage.
What’s next?
Find out how to search and filter for important information with the OnTime app.
Need more help?
No problem, that's what we're here for. Reach out to support@wiise.com anytime you can't find what you're looking for.