Overview
Learn how to set up locations to work with Wiise Warehouse OnTime
Why do I need to set up locations?
In Wiise, you can set up locations within your company to help keep track of inventory stored at different physical locations. Each location can then be split into bins to help you easily locate where inventory is stored. Bins are a prerequisite for Wiise Warehouse OnTime.
How do I set up locations?
Create new locations within Wiise Desktop
-
Search for and select Locations.
-
Open New on the top menu bar and select +New.
-
In the Code field, enter an identifiable code for the location.
-
In the Name field, enter the name of the location.
-
Fill in the additional details for the location under Address & Contact.
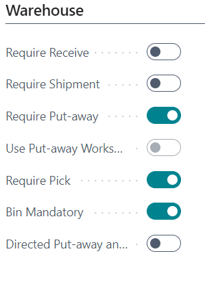
Enable the location to work with Wiise Warehouse OnTime
Under the Warehouse tab, enable the following settings
-
Require Put-away
-
Require Pick
-
Bin Mandatory
Create bins for the location
-
Open the newly created or existing location. Select Bins in the top menu bar on the location card.
-
The Bins page will now be opened. Select +New in the top menu bar. A new line in the table will be added.
-
On the new line, enter in the Code field to modify the bin. Add a Description if needed.
-
The new bin location will save automatically.
Does Wiise Warehouse OnTime work with existing locations?
Yes, OnTime can work with your existing locations already set up within your environment, There are some limitations within the settings of locations. If Require Shipment or Require Receive is enabled, the location will not work with OnTime. You can disable these settings if they are not needed for your location. Discuss with your partner before making any changes to your existing location set up.