Overview:
- Learn how to set up an item card in Wiise.
Why set up a new item?
For a business that retails goods and services, you can track the activities such as buying, manufacturing and selling of each type of goods and services by creating an item for each individual goods or services.
How to set up a new item?
- Search for Items on the top right-hand corner of the page or select Items from your action menus on your Wiise landing page. The items list display.
Note: You can Bookmark your search as a favourite added to your Wiise landing page.
Note: You can update your role profile in My Settings if you require another role that fits your business purpose such as Inventory Manager, Manufacturing Manager or Service Manager and create an Item from there. - Select +New to create a new item card or select the No. field to edit an existing item card.
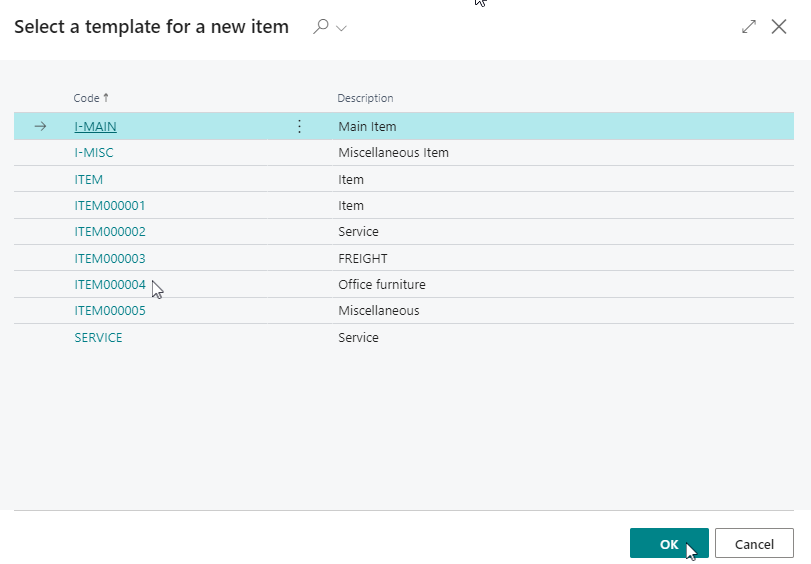
- Select a template for a new item to create the item card.
Note: Item templates are a useful function as the template contains all the fixed fields for a certain group of items for office furniture, freight or miscellaneous. You can create item templates to the specifics of your business.
- Select OK to continue.
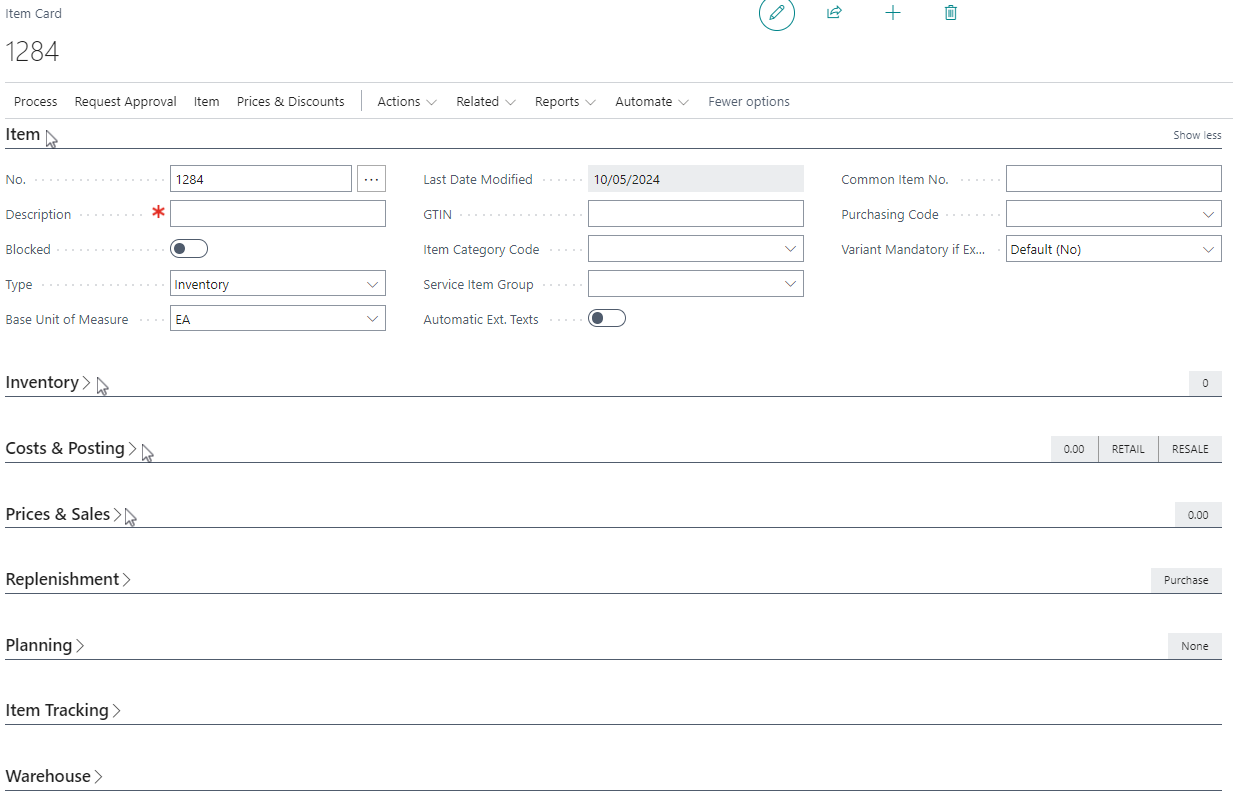
Note: The new item card displays. By selecting the item template, you’ll notice some fields have been entered automatically such as the product posting group, replenishment system, the inventory posting group and so on.
Note: Update which functions you want to use. The item card displays eight fasttabs or sections where editable fields need to be filled in.
Note: To set up a basic item you might want to focus on the Item section, Inventory section and the Costs & Posting section. For the advanced items which includes processes such as manufacturing, assembly and purchasing related tasks, you’ll need to update the Replenishment section, Planning section, Item Tracking section and Warehouse section. - Here are the steps to update the item card sections:
- Item section:

- Provide a Description of the item.
- Identify the Type of Item. From the drop-down menu, you’re shown three types of options:
- Inventory: These are physical items which you want to keep track of the inventory. Wiise will create item ledger entries.
- Service: These are non-physical items like labour, repair or maintenance.
- Non-Inventory: These are physical items for which you don’t want to track in Inventory.
- Specify the Base Unit of Measure. This is the smallest unit in which the item can be purchased or sold. Use the drop-down menu to select the appropriate unit of measure.
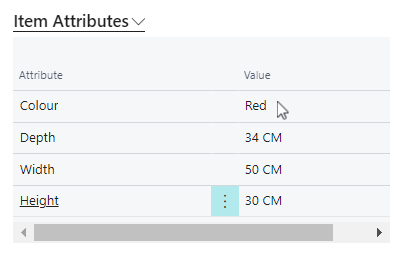
Note: If the unit of measure you want to assign is unavailable from the drop-down menu, you can set up a new unit of measure. - You can set up an Item Category Code related to the item you’ve created. By setting up the item category, item attributes are added onto the information tab that you can further update in terms of colour, depth, height and so on.

-
- Update Common Item No.: This field specifies the unique common item number that the intercompany partners agree upon.
- Update the Purchasing Code: This field specifies the code for a special procurement method, such as drop shipment or special orders.
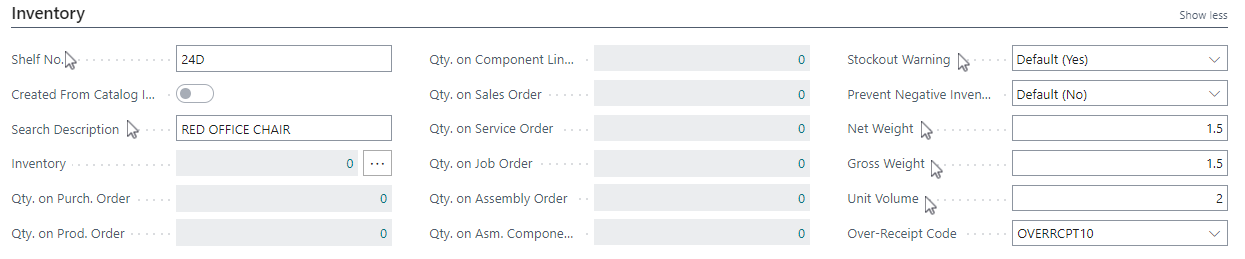
- Inventory section:

- Update the Shelf No field of where this item is stored.
- Update the Search Description field for you to use to find the item in lists.
- Identify if you want to receive Stockout Warning notifications. The default setting is Yes. You can select No if you wish. A warning is displayed when you enter a quantity on a sales document that brings the item's inventory below zero.
- Identify if you want to be notified to Prevent Negative Inventory. The default setting is No. This allows you or stops you from posting a transaction that will bring the item's inventory below zero.
- Set the Net Weight, Gross Weight and Unit Volume of the item.
- The Over-Receipt Code field is a policy set by your business used for the item if more items are received than ordered.
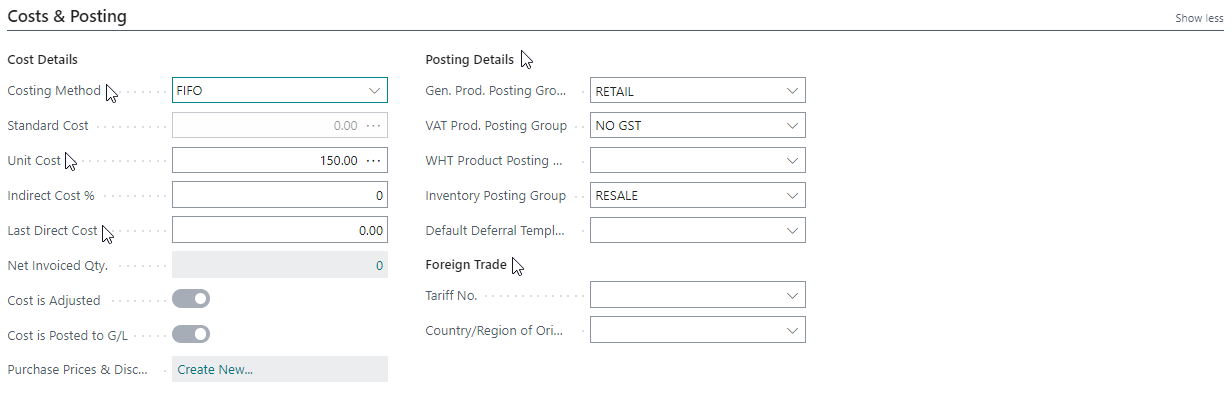
- Cost & Posting section:

- Update the type of Costing Method field for the item. Select from one of the five methods in the drop-down menu.
- FIFO: First In, First Out. Items are sold in the order they are received. Use for products with stable costs and limited shelf life.
- LIFO: Last In, First Out. Items are sold in the reverse order they were received. Use when inventory levels are consistent. This method is rarely used as it can depress profit.
- Average: Items are sold at an average unit cost. Use when product cost is unstable with mixed inventories.
- Specific: Each item’s cost is tracked individually. Use for easily identifiable, regulated items with high unit costs. Specific items can have serial numbers.
- Standard: Items that have a preset cost and later adjusted to an actual cost. Use for cost control and repetitive manufacturing.
- Enter the Unit Cost of the cost of each separate unit of the item.
- Update the Indirect Cost % field: percentage of the item's last purchase cost that includes indirect costs, such as freight that is associated with the purchase of the item.
- If applicable, enter the Last Direct Cost of the item. This is the field that Wiise will use on purchase documents. If you want Wiise to suggest the Unit Cost you’ve set for this item for the first time you create a purchase order, you’d have to set the Last Direct Cost to be the same Unit Cost of the item.
- Posting details comprising of Gen. Prod Posting Group, VAT or GST Prod. Posting Group and not limited to Inventory Posting Group fields would have been populated from the item template.
- You can set up a Default Deferral Template: This field indicates how revenue or expenses for the item are deferred to other accounting periods by default.
- If your business for the item set up is part of a foreign trade, update the Tariff No field and Country/Region of Origin Code field.
- Update the type of Costing Method field for the item. Select from one of the five methods in the drop-down menu.
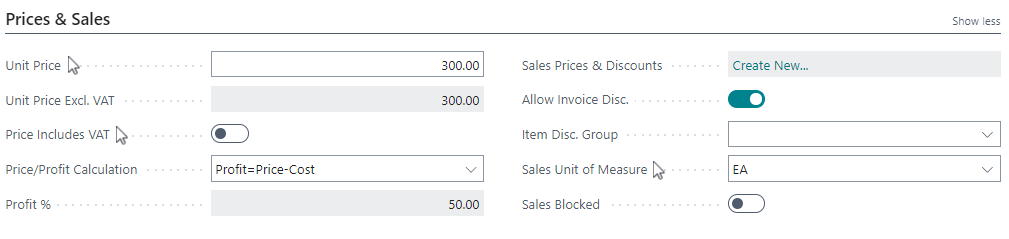
- Prices & Sales section:

- Set the Unit Price of the item price that you’re selling.
- You can enable the Price includes VAT toggle button for the Price to include VAT or GST.
- In the Sales Prices & Discounts field, you can create tiered sales prices and apply discounts for the item.
- Enable the Allow Invoice Disc toggle button if you wish.
- Assign an Item Disc. Group for the business based on the policies you’ve set up.
- Set the Sales Unit of Measure for the item you’re selling.
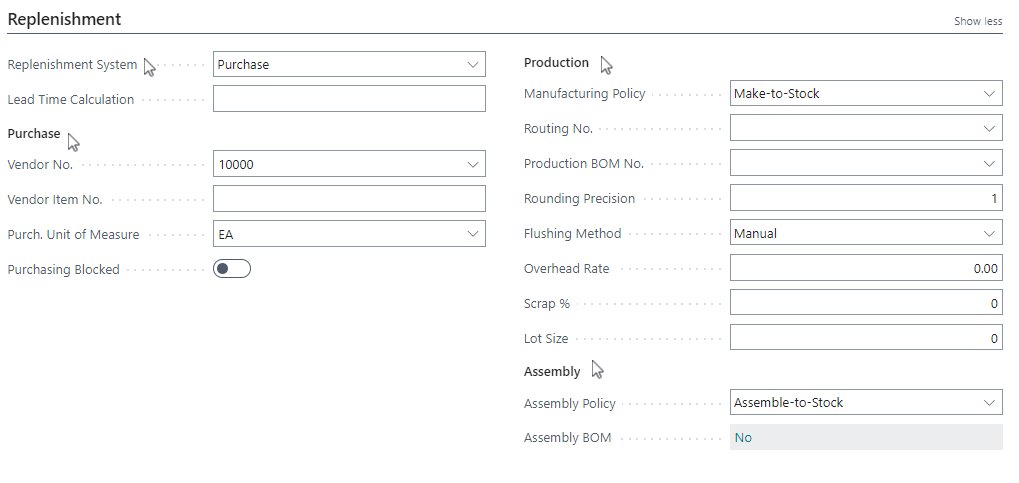
- Replenishment section:

- The Replenishment System field is used in the planning functionality. Wiise creates replenishment lines in the requisition worksheet or in the planning worksheet like Purchase, Production Order, Transfer or Assembly.
- You can add a Lead Time Calculation to show how much time it takes for the vendor to ship the item to you. For example: If the lead time calculation is 1 week, enter 1W in the field.
- If you want, you can update the Vendor No that is used in the requisition worksheet or leave it blank.
- If your business has an advanced Production or Assembly function, you can update the relevant fields with information.
- Identify the Manufacturing Policy in your business. There are two options:
- Make-to-Stock: This is a production strategy used by your business to match inventory with anticipated consumer demand.
- Make-to-Order: This is a production strategy in which the production of an item begins only after an order is placed by a customer.
- Update the Routing No field: This is the number of the production routing that the item is used in.
- Update the Production BOM No field: This is the number of the production BOM that the item represents.
- Update the Rounding Precision field. This is how calculated consumption quantities are rounded when entered on consumption journal lines.
- Update the Flushing Method you use in your business. The flushing method defines how consumption of the item is calculated and handled in the production process. There are five methods.
- Manual: To keep track of your consumption, you need to enter and post it manually in the consumption journal.
- Forward: Automatically posts consumption according to production order item lines.
- Backward: Automatically calculates and posts consumption according to production order item lines.
- Pick + Forward: Select this method if the item is used in a location that is set up for directed put-away and pick.
- Pick + Backward: Select this method if the item is used in a location that is set up for directed put-away and pick.
- Fill in the Overhead Rate field: This is a cost added to the direct costs of production to accurately assess a product's profitability.
- Based on your business policy, update the Scrap % field as the percentage of the item that you expect to be scrapped in the production process.
- Update the Lot Size field. This is the default number of units processed in one production operation, which affects standard cost calculations and capacity planning.
- Identify the Assembly Policy in your business. This default order flow is used to supply this assembly item. There are two policies a business may use.
- Assemble-to-Stock: Items are already manufactured and not yet assembled but are not customisable.
- Assemble-to-Order: This is a business production strategy where products ordered by customers are already manufactured but not yet assembled. This allows room for customers to customise the assembly of the product.
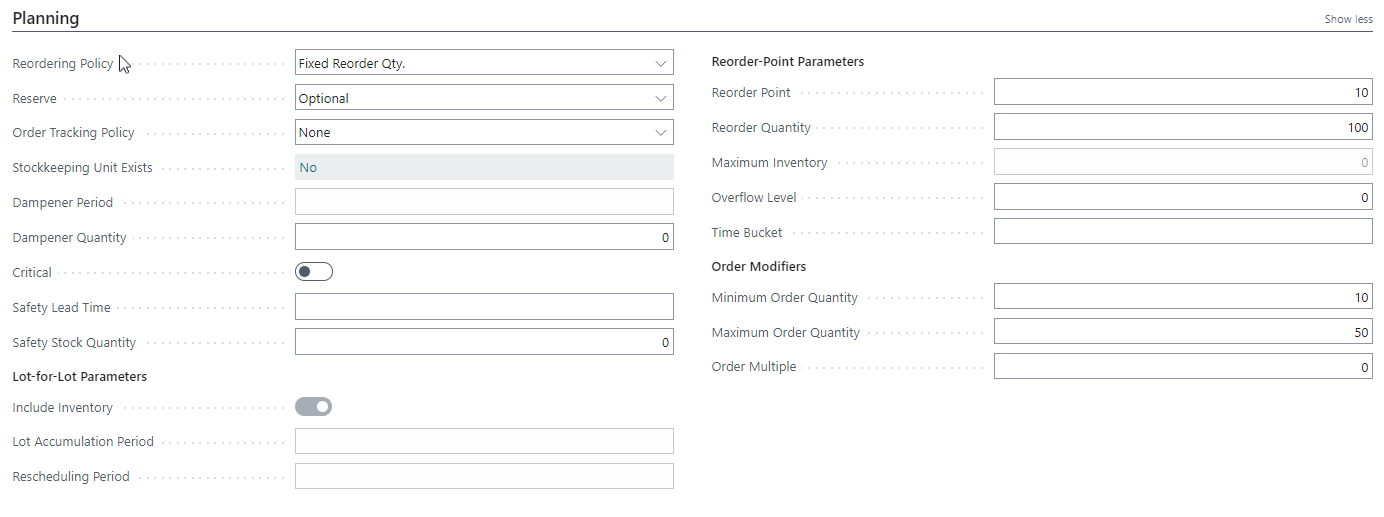
- Planning section:

- Select the Reordering Policy field based on your current business policy.
Note: Based on the policy that you select, the required fields will become editable. The selected policy may make other fields non-edible or greyed out. - There are four different planning methods to select from:
- Order: Consider selecting this policy for make-to-order items, specifically for top-level items and expensive components. It is most suitable for items that are purchased as drop shipments and special orders, but it should not be used for automatic reservation. This policy is particularly effective for high-end items, such as leather couches in furniture stores.
- Lot-for-Lot: Use this policy for components or items that appear in multiple BOMs.
Note: Lot-for-lot items are frequently used, have a high order volume, and come with high costs. By ordering what is needed, you can reduce inventory costs from holding excess inventory and help maintain better cash flow. By adopting this policy, you can consolidate purchase orders from the same vendor and negotiate for better prices. - Fixed Reorder Qty: This policy is intended for the use of the lowest-level components. It does not apply to items that are often reserved
- Maximum Qty: Low-value items with high and regular orders, such as ballpoint pens, are ideal for using when carrying costs or storing limitations are high.
Note: When you're unsure which planning method to choose from the four different options available, use the Lot-for-Lot policy as a default choice. - Update the Reserve field. This identifies how the item will be reserved.
- Never: You can't reserve the item.
- Optional: You can manually reserve the item when required.
- Always: The system automatically reserves inventory for sales, purchase, assembly, and production orders.
- Update the Order Tracking Policy field: The policy explains how order tracking entries are created and maintained between supply and demand as it is meaningful for demand-driven planning. There are three settings:
- None: No reservation or tracking is associated with the item.
- Tracking Only: Only tracking is associated with the item.
- Tracking & Action Msg: This action reserves and tracks items by creating messages on planning lines, improving supply planning efficiency.
- The Stockkeeping Unit Exists field is a calculated field that displays if you have stock keeping units that you’ve set up as items per location.
- Update the fields Dampener Period with a date and Dampener Quantity with a quantity. These fields are designed to ensure that you don't have to keep replanning the item. For instance, if the demand for this item is 100, and you have adequate supplies to meet the demand, but the demand suddenly exceeds the Dampener Period or is less than the Dampener Quantity, it means you can set up the planning and avoid changing the supply order, purchase order, or transfer order frequently.
- You can set up the item as Critical. Just enable the toggle button. This will promise that the item will be shipped and made available.
- Safety Lead Time field is a date formula used to extend supply beyond demand and increase Safety Stock Quantity during replenishment time. You’d use the Safety Stock Quantity field if you plan to use the Lot-for-Lot reordering policy. You can decide if the existing Inventory should be included. Select to enable the Include Inventory toggle button.
- You can define a period by entering 1M which is 1 month in the Lot Accumulation Period field to bundle the demands should you have several demands; the system will determine how far ahead to calculate and bundle the several demands into one demand.
- The Rescheduling Period field calculates the date. You can add 1M here to reschedule an existing supply order.
- If you select the Fixed Reorder Qty reordering policy, you can select Reorder Point or Reorder Quantity.
- You can define the Overflow Level which means if demands disappear when orders are cancelled, what level of inventory would you accept before the system suggests cancelling orders.
- To keep things simple, with the fixed reorder qty reordering policy, you can set up the Time Bucket field to 1W which is 1 week and make use of the Reorder Quantity to bundle the demand to reduce changes in journals.
- Order Modifiers, applies to all the reordering policies. You can update the Minimum Order Quantity and Maximum Order Quantity. You can update Order Multiple if you want to change your orders after the system calculates your orders.
- Select the Reordering Policy field based on your current business policy.
- Item Tracking section:

- The Item Tracking Code is a unique identifier assigned to a product for tracking its movement within the supply chain. You can also update the Serial Nos, or associated Lot Nos. Select the drop-down menu to make your selection.
- Warehouse section:

- Identify the Warehouse Class Code for the item.
- If necessary, update the other specific codes on these editable fields.
- You can enable the Use Cross-Docking toggle button for items you receive and ship without putting them away.
- Update the Duty Code and Duty Due % when you ship to foreign countries. This is used in landed cost calculations when the goods are ordered from overseas.
- Specify the Unit Volume and Net Weight of the item.
- Item section:


Note: If you’re using planning for your item, you might want to set up stockkeeping units when you have multiple locations where your inventory is stored.
What’s next?
Find out how to set up stockkeeping units, how to set up units of measure, how to set up item categories, or how to set up dimensions for your items.
Need more help?
No problem, that's what we're here for. Reach out to support@wiise.com anytime you can't find what you're looking for.