Navigating Wiise Payroll
Overview:
- Learn to navigate Wiise Payroll in Wiise
Why navigate Wiise Payroll?
Work efficiently in Wiise and Wiise Payroll with easy-to-access action menus, allowing you to complete tasks simultaneously.
How to navigate Wiise Payroll?
The Wiise landing page (role centre) is a dashboard with actions and activity. These tiles show you real-time information with quick access to data. From here you can navigate Wiise and Wiise Payroll to perform your role as the payroll officer in the business.
Your Wiise landing page
- Log into Wiise.
- You're taken to your dashboard view which is your Wiise landing page or role centre.

Note: When you’re assigned a Business Manager or Accountant role profile, you can see more actions and activities on your Wiise landing page.
Note: To set up Wiise Payroll, you’ll require a Payroll Officer role assigned to you in User Setup in Wiise.
Note: To enable the Wiise Pay Run Insights widget on your Wiise landing page, you’ll also need to be assigned Wiise AU Payroll or Wiise NZ Payroll user permissions in the User page in Wiise.
Note: Find out how to set up and use Wiise Timesheet Insights widget. - The application bar on the top right-hand corner of the page contains quick access menus for switching company, search, notification, settings, notifications, help and your profile details.

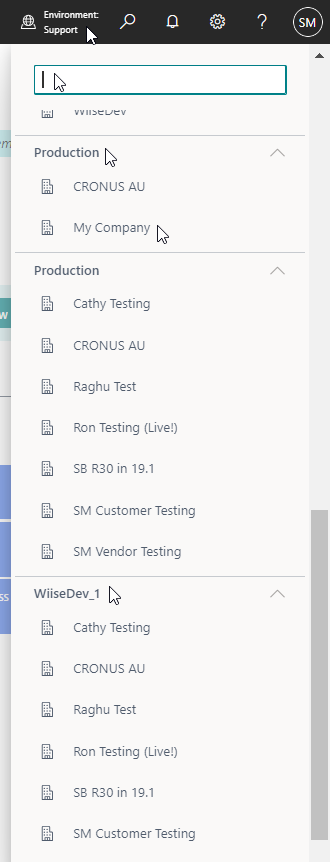
- You can switch companies between all environments in Wiise:
- Select the Environment icon on the top right-hand corner of the page. A list of companies and environment options display.

- Select a company you want to switch to.
Note: It’ll take a few minutes to process before your selected company opens.
- Select a company you want to switch to.
- You’ve switched companies.
- Select the Search icon to help you search Wiise for what you’re looking for.

Navigate to the Wiise Payroll action menu
Here are steps to navigate to the Wiise Payroll action menu after you’ve registered and set up Wiise Payroll.
- Select Wiise Payroll action menu from your Wiise landing page.

- You’ll see ten actions to perform your Wiise Payroll tasks. These are:
- Pay Runs: A pay run is the process of calculating and distributing employee wages, taxes, and deductions for a specific payroll period.

- Use the Pay Runs action menu when you’ve finalised and imported approved pay runs from Wiise Payroll into Wiise.
- Then, you can post payroll journals in Wiise.
- Timesheets: Timesheets are records used to track the hours an employee has worked during a specific period for accurate payroll processing.

- Timesheet approvers can use this menu to action employee’s timesheets updated in Wiise.
Note: Wiise approved timesheets are imported into Wiise Payroll.
- Timesheet approvers can use this menu to action employee’s timesheets updated in Wiise.
- Job Journals: Use this action menu to post approved jobs and resources into Wiise journals.

- Employees: Once you create an employee in the Wiise Payroll system, they’ll automatically be created in Wiise with an assigned Employee No.
Note: You can access the employee card, resource card and set dimensions here.
- G/L Account Setup: Auto generated pay conditions from Wiise Payroll are auto mapped to Wiise general ledger accounts.

Note: You’re not required to set up the chart of accounts in Wiise Payroll. Find out how to map pay runs in Wiise Payroll.
Note: You can add accounts for reporting. Add them in Wiise Payroll so they are auto synced to Wiise.- Edit the list to update the Account No., and Balancing Account No., in Wiise.
- Then, select the Get Accounts action to map to your Wiise general ledger accounts.
Note: The Get Accounts action works only if you’ve set up the Advanced G/L account setup.
- Dimensions: The page displays the dimensions set up in Wiise ERP that can be synced to Wiise Payroll. Synced dimensions are marked with a tick in the Sent to Wiise Payroll column.

Note: When you update a dimension in Wiise ERP, you must select the Send to Wiise Payroll action to sync the changes.
Note: This function is helpful when using the Group Transactions by Wiise Payroll Dimension setup. - Work Types: The work types you’ve set up in Wiise Payroll are imported into Wiise. These can be categories that require mapping to Wiise general ledger accounts. When you’ve created more work types in Wiise Payroll, you can sync them to Wiise by selecting Actions. Then, select Get Work Types.

- Locations: The locations you’ve set up in Wiise Payroll are mirrored and synced to Wiise.

- Setup: This is the first action you should select when you register for Wiise Payroll. Once Wiise Payroll is set up, you can select the type of G/L account setup.
- Access your Wiise Payroll file by selecting the hyperlinked 6-digit Wiise Payroll Business ID.

Note: You can bypass Wiise and log in separately from this URL link: https://wiise.yourpayroll.com.au/. Similarly, users who don’t have access to Wiise and only need access to Wiise Payroll need to log into Wiise Payroll using the URL link above. - Manager Timesheets: Timesheet approvers go to this action menu to action timesheets submitted by employees. You can see the status of the timesheet on the right side of the page.

- Select the hyperlinked No., fields to action the timesheet.
- You now know how to navigate Wiise Payroll from Wiise.
What’s next?
Find out how to set up your business details in business settings in Wiise Payroll.
If you have any questions, please reach out to support@wiise.com