Overview: Steps to set up Yodlee Open Banking Bank Feeds in Wiise
- Work with your bank to authorise data sharing for bank feeds.
- Ensure you have the right permissions in Wiise to enable bank feeds
- Enable bank feeds in Wiise.
- Add a bank account feed to Wiise.
- Set up reconciliation type and frequency.
Why enable bank feeds in Wiise?
A bank feed is a list of transactions from your bank account that links directly into Wiise through a data feed. By setting up automated bank feeds, you no longer need to manually download bank statements from your bank.
1. Work with your bank to authorise data sharing for bank feeds
Before you begin! Make sure you have set up the following permissions and requirements below.
Wiise Bank Feeds leverages Yodlee Open Banking bank feeds. To enable these bank feeds, you'll need to consent to share your data via your bank to comply with the Consumer Data Right (CDR) and Open Banking requirements. This a legislated government requirement.
Working with Your Bank to Set Up Data Sharing
To use Yodlee open banking bank feeds with your Enterprise Resource Planning (ERP) system, you'll need to work with your bank to set up data sharing:
- Contact your bank: Reach out to your bank's customer service or relationship manager to inquire about setting up data sharing through Open Banking with Yodlee.
- Link your accounts: Provide the necessary consent for your bank to share your data with Yodlee. This typically involves:
- Logging into your bank's online portal.
- Navigating to the data sharing or Open Banking section.
- Selecting Yodlee as the third-party provider.
- Specifying the data you want to share and the duration of access.
- Set up Wiise Bank Feeds: Once Yodlee has access to your bank data, you can integrate the bank feeds into Wiise using the setup wizard.
- Check that Wiise Bank Feeds is set up: Ensure that the data sharing and integration processes are functioning correctly with Wiise.
Note: Most banks already allow data sharing as a default for business accounts. Contact your bank and check how to enable data sharing for your business accounts. Do this as a first step before adding a bank account to your Wiise ERP bank feeds. You can find this information on your bank’s website as well.
2. Ensure you have the right permissions in Wiise to enable bank feeds
- You'll need to be set up as a Business Manager or Accountant role in Wiise
- You'll need Banking Officer function enabled in User Setup.
Note: Users assigned a Business Manager role or Accountant role can see the Bank Account cue card in the Wiise Insights section on the Wiise landing page.
You must be set up as a Banking Officer to use Wiise Bank Feeds.
Reach out to your IT Service Provider or Solutions Partner to enable your access.
3. Enable bank feeds in Wiise
- Select the Enable bank feeds button on Wiise Insights which can be found on your Wiise landing page (role centre).

Note: If you're unable to view the Wiise Bank Feeds Panel on your Wiise landing page, request your IT admin to install the Wiise app updates. - The Consumer Data Right (CDR) privacy statement and complaints and access policy displays. At the bottom of the page, the Accept button is greyed out.
- Select the tick box to acknowledge the terms and conditions.
- Then, select Accept to complete the approval of the policy.

- You’re done. Bank feed is enabled on Wiise. Select OK to close the page.

- You’ll receive a confirmation Your Bank Feeds are enabled email in your inbox.

- You have now enabled the bank feed features.
- You can now add a bank account to your bank feeds.


Note: When you’ve enabled bank feed features, the bank feeds show enabled on your Wiise Bank Feeds panel.
4. Add a bank account feed to Wiise
- Select Add a bank account on the Wiise Bank Feeds panel on your Wiise landing page.

- The Consumer Data Right (CDR) privacy statement and complaints and access policy page displays.

- Read the policy and scroll down to the bottom of the page. The Accept button is greyed out.
- Select the checkbox to acknowledge the terms and conditions. The Accept button turns blue.
- Select the Accept button to accept the policy.

Note: Once you’ve accepted the policy, you can connect the bank account feed from your online banking site to Wiise.
- A list of popular banks is displayed. If unsure, you can search for your bank using the search functionality.

Note: When you search for your bank, remember to select the bank with (CDR) in brackets next to the bank name. These are banks that comply with the consumer data rights privacy statement that you accept when adding a bank account to Wiise. - Select a bank to get started. The How you’ll share your data message displays.

- Select Get Started.
- The Consent page displays. You’ll need to update the sharing period data request, select the data that we can access, read up information on how your data will be treated and provide your consent.

- Select the Sharing Period drop-down menu. Select either 90 days (about 3 months), 180 days (about 6 months) or 365 days (about 12 months).
Note: When you’ve selected the sharing period days, you can see Your Sharing Period duration. When the sharing period duration ends, you'll need to renew your consent.
- The Consent page displays. You’ll need to update the sharing period data request, select the data that we can access, read up information on how your data will be treated and provide your consent.
- Select the data that Wiise can access. Select Your Accounts Details and / or Transaction Details.

- Review the Treatment of Your Data.

- Select I Consent for us to manage your data in Wiise.

- Select Connect to be redirected to your bank login app.

- Login to your online banking and select the bank accounts you’d like to connect with Wiise.
Note: The login interface differs with each bank. The authorised signatory who is the account holder who's signed the consent form needs to login, update all the accounts to share in Wiise and then, confirm the bank feed and data sharing permissions. You may be asked for the One Time Password (OTP) when you login to connect your bank feed. - If multiple accounts are added, you can select all accounts. Otherwise, select each account individually. Then, select Next.

- Confirm the bank feed and data sharing permissions.

- As a last step, a message displays that you've selected the accounts you want to verify. Would you like to aggreggate your bank (CDR) accouts too?
- Select Yes, aggregate my accounts. This action enables the daily bank feed transactions into Wiise.

- Select Yes, aggregate my accounts. This action enables the daily bank feed transactions into Wiise.
- Your connected bank feeds will be added to the Wiise Bank Feeds panel in your Wiise landing page.

Note: Notifications appear on the 'bell' icon on the top right-hand corner of the Wiise Bank Feeds panel. You'll receive notifications where there is an error in the bank feed and when your CDR consent is set to expire within 30 days. - When the bank account feed is enabled in Wiise, you’ll receive an email confirmation of a new bank account feed added with an update to the consent you’ve accepted.


Note: You can manage consent to the bank account feed at any time via your Wiise bank feed dashboard in your Wiise landing page.
Note: You’ll need to link the connected bank feeds and set up the reconciliation type and frequency.
5. Set up reconciliation type and frequency.
- Search for Linked Bank Accounts from the top right-hand corner of the page. The linked bank accounts page displays.

Note: The bank feeds that are linked to a bank account in Wiise will display a bank account code in the Wiise Bank Account column. - Select Edit List to update the fields.
- Select the row you want to link the bank account.
- Then, select the field Wiise Bank Account and use the drop-down to select the bank account code.
Note: If the bank account does not exist, you'll need to set up a new bank account before you can link the bank feed.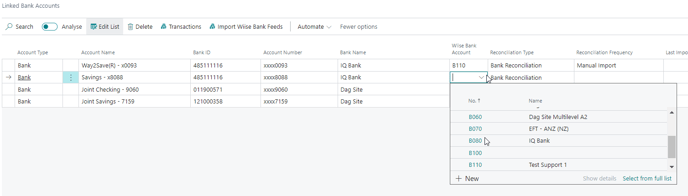
- Select the drop-down menu in Reconciliation Type. Here are the options:
- Bank Reconciliation: when you select this option, imported transactions are linked with a Bank Account Reconciliation. This is the default option.
- Payment Reconciliation: when you select this option, imported transactions are linked with Payment Reconciliation Journals.
- Select the drop-down menu in Reconciliation Frequency. Here are the options:
- Automatic Daily: imported transactions are added to a new reconciliation for processing each day.
Note: You may end up with multiple outstanding reconciliations if you don't process imported transactions daily. - Automatic Single Reconciliation: imported transactions are added to an existing open reconciliation. If none exists, a new one is created.
- Manual Import: no reconciliations will be created automatically, and transactions will not be linked.
Note: By default, when you first set up your bank account feed, your reconciliation frequency is set to Manual Import. You'll need to import bank transactions of your unposted reconciliations by selecting Import Wiise Bank Feeds on the Linked Bank Accounts page.
Note: If you want to see a history of all imported linked bank transactions, select Transactions on the Linked Bank Accounts page.
- Automatic Daily: imported transactions are added to a new reconciliation for processing each day.
- You’ve now linked your bank account to your Wiise bank feeds. You can review them in the Wiise Bank Feeds panel on the Wiise landing page.
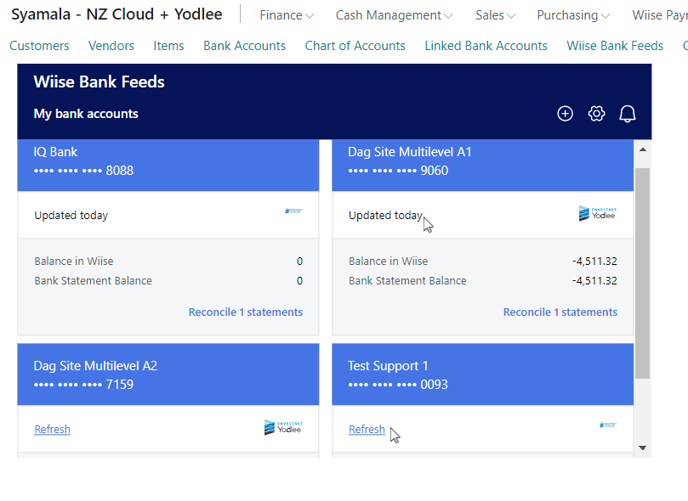


Note: You can see the status of your bank account feed informing you of how many statements there are to reconcile. When you select the Reconcile X statements hyperlink, you’ll be taken to the bank account reconciliation page or payment reconciliation page to reconcile your bank transactions.
Note: When you set up your reconciliation frequency to Automatic Daily, you'll see Refresh status appear on your bank account panel every morning. This automatically gets updated when bank feeds come in daily.
Caution: Please do not select the Refresh status as this is an automated function.
What’s next?
You can now reconcile statements using the bank account reconciliation or payment reconciliation methods based on the reconciliation frequency you’ve set up on your linked bank account.
Should you have any issues with your bank feed, check the status of your bank accounts.
Need more help?
No problem, that's what we're here for. Reach out to support@wiise.com anytime you can't find what you're looking for.