Overview:
Learn how to complete shipment in the Wiise Warehouse OnTime app.
Why use Wiise OnTime to complete a shipment?
Shipping is the process where you gather already picked orders and send them out of the warehouse to customers and vendors.
With OnTime, you can optimise this process by eliminating the need to print out order slips and reenter the shipping details in Wiise. Instead, you can use the OnTime app using a handheld device and scan the shipping details directly into Wiise. By scanning the shipping barcodes, you can easily validate that you have entered the correct information, effectively avoiding any potential mistakes. Also, you can add photos and notes for the shipment directly from the OnTime app.
How does a shipment get created in Wiise Warehouse OnTime?
-
On Wiise Desktop, select the search icon in the top right corner.
-
Search for and open Warehouse Shipments.
-
In the top menu bar, select New.
-
On the shipment page, enter the following details:
-
In the Location Code field, select the location you're shipping from.
-
If the location requires bins, select a bin from the Bin Code drop-down.
-
-
To get the source document, use the get source documents action:
-
On the top menu bar, select Prepare.
-
Select Get Source Documents from the drop-down menu.
-
Select one or more source documents that are required to be shipped.
-
Select OK.
-
-
On the item lines, enter the quantity to ship.
-
When ready, select Post Shipment or Post and Print from the top menu bar.
-
The shipment has now been posted.
How to complete a shipment using Wiise Warehouse OnTime
-
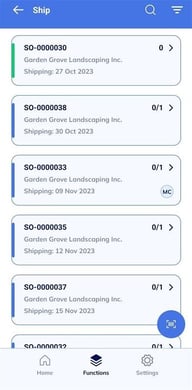
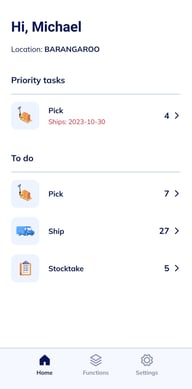
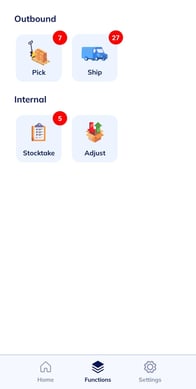
On the Home Screen, select Ship. (You can also find this on the Functions page from the menu bar at the bottom of the screen.)
-
Find your sales order from the list or by selecting the search Magnifying Glass icon. If there are many sales orders, you can also filter the list by Customer Name, Number or Document Date.
See Navigating Wiise Warehouse OnTime for more on how to use the filter menu.
-
Select the sales order you wish to ship.
This will open the shipment and check this out to you. Other users won't be able to work on this shipment. If you open a Ship Order by accident or need to return it to the list to be worked on by another user, this can be done on the Wiise Desktop.See How to remove a task from a team member in Wiise Warehouse OnTime for more information.
-
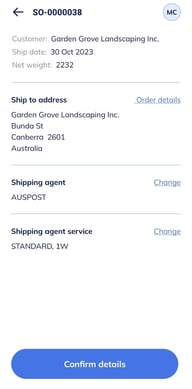
The ship order is now open. You will see the order details including;
-
Customer details
-
Ship date
-
Ship to address
-
Shipping Agent
-
Shipping agent service
-
-
To confirm customer shipping details, select Order details on the right-hand side of the Ship to address field.
-
The shipping agent may already be chosen in Wiise.
-
If no shipping agent has been selected:
-
select the magnifying glass icon under the Shipping Agent field.
-
A list will display with available shipping agents.
-
Select the shipping agent you wish to choose.
-
Once selected, select Save in the blue button at the bottom of the page.
-
-
-
Under the Shipping agent service field, select the magnifying glass icon. A list will display with available services the shipping agent provides. Select the service you wish to choose. Once selected, select Save in the blue button at the bottom of the page.
-
Once all details are verified, select Confirm details in the blue button at the bottom of the page.
-
If the requested delivery date can not be met by the selected shipping agent service, a warning will be displayed. You will be presented with two options to select:
-
Change: Selecting this option will allow you to change the shipping agent to get the shipment delivered on time.
-
Proceed: By selecting this option, you acknowledge the shipment will not meet the customer's selected delivery date.
-
-
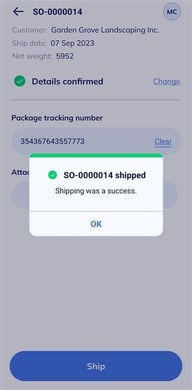
The shipment order details have now been confirmed.
-
You can now enter the package tracking number. Select the scan icon to scan the tracking number.
-
Alternatively, you can enter the tracking number manually with your keyboard by selecting the field.
-
-
You can add photos and notes as an attachment to the shipment to store in Wiise Desktop.
-
To add photos, select Take Photo to add images to the shipment details. Select the blue camera button at the bottom of the page when ready to take the photo.
-
To add a note, select Add note. Enter in the box box any additional information you wish to add.
-
-
When package tracking details have been completed, select the blue Show Picks button at the bottom of the page.
-
You will now see a list of the picks to be shipped out. The picks are categorised under either posted or unposted. All unposted picks will need to be completed and posted before the shipment can be sent.

-
Select an unposted pick from the list.
-
To complete the pick, follow the steps in this guide here: How to pick outbound orders using Wiise Warehouse OnTime
-
Once all picks have been posted, select the blue Back to Sales Order button at the bottom of the picks list page.
-
You have now been returned to the Sales Order screen. A blue Ship button will now be visible on the bottom of the page.
-
Select the Ship button.
-
Your ship order has now been completed and posted.
What happens once I post a shipment back to Wiise ERP Desktop?
Now that the shipment has been completed, it has been posted back to Wiise ERP Desktop.
If it has been posted:
-
The shipment date field in the tasks document has been updated to the correct date.
-
The posted command has been run.
-
The document has been moved to the Posted Sales Shipment.
Can I set when shipments should be listed as a priority?
By default, the priority status calculation is not set to a date calculation. You can set the date calculation for shipments from the configure functions page. To set the priority status calculation, follow this guide: How to configure functions for Wiise Warehouse OnTime