Overview
Learn how to use Wiise Warehouse OnTime to support an efficient and accurate picking process.
- Why use OnTime to complete picks?
- How to create a pick in Wiise Desktop to send to OnTime
- How to complete a pick using Wiise Warehouse OnTime
- What happens once I save or post a pick back to Wiise ERP Desktop?
The outbound order process
Here’s a level view of the outbound order process in Wiise:
-
Create the source document (Sales order, transfer order, purchase return order).
See How to Create a Sales Order for more on creating a sales order. -
Release the source document
-
Create an Inventory Pick
-
Open the Wiise Warehouse OnTime app and select Inventory Pick
-
Select a pick from the list
-
Pick the items
-
Save or post the pick back to Wiise

Why use OnTime to complete picks?
Picking is the process where you select and gather items from their storage locations to fulfil customer orders or transfer orders.
With OnTime, you can optimise this process by eliminating the need for physical copies of the picking list. Instead, you can use the OnTime app using a handheld device. By scanning the item barcode, you can easily validate that you have selected the correct item, effectively avoiding any potential for picking incorrect items.
How to create a pick in Wiise Desktop to send to OnTime
A pick can be created from the following source documents:
-
Sales order
-
Outbound transfer order
-
Purchase return order
-
Service order
-
In Wiise Desktop, from the source document, select the Process menu
-
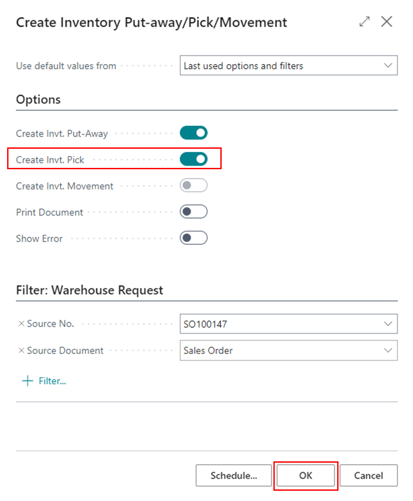
Select Create Inventory Put-away/Pick
-
On the Report Filter screen, ensure Create Invt. Pick is enabled.
-
Select OK.
-
This is now ready to be picked in the warehouse.
How to complete a pick using Wiise Warehouse OnTime
-
On the Home Screen, select Inventory Pick. (You can also find this on the Functions page.)
The Inventory Pick screen displays a list of pick tasks that need to be completed. The list is sorted by the Shipping Date, with Inventory Picks having the earliest date at the top of the list.
-
Find your Inventory Pick in the list or by selecting the search Search icon. If there are many picks, you can also filter the list by Source Type or Destination Name.
See Navigating Wiise Warehouse OnTime for more on how to use the filter menu.
-
Select the Inventory Pick you want to fulfil.
This will open the pick and check this out to you. Other users won't be able to work on this pick. If you open an Inventory Pick by accident or need to return it to the list to be worked on by another user, this can be done on the Wiise Desktop.
See How to remove a task from a team member in Wiise Warehouse OnTime for more information. -
Select an item in the list. You can do this by:
-
Selecting the item on the screen
-
Selecting the floating scan button and using an in-built camera
-
Using the trigger on a hardware device.
-
-
The item has now been selected on the pick list.
-
Go to the bin shown in the Bin Code on the item card.
If the bin shown is not accessible, or if you can’t pick the item from the specified bin, you can change the bin.
-
Pick the item from the bin.
-
Verify that the Item Number, Item Description, Variant Code (if applicable) and UOM (Unit of Measure) of the picked item match what is displayed on the screen.
-
Select Scan Item to scan with the device camera or the barcode scanner.
-
Point the device at the barcode of the item.
-
If the item scanned matches the item on the Pick Item screen, you will see a quantity selector.
-
Use the + and - buttons to update the Picked quantity or tap the Max button to pick the full quantity required.
If you are unable to pick all items from the specified Bin, you may need to split the line. For more information on how to split a line see How to split a line using Wiise Warehouse OnTime. - If the item requires item tracking (serial, lot or package numbers) to be added, please follow these steps:
- You will see a blue Add item tracking button at the bottom of the screen.
- Select the Add item tracking button.
- In the first required field, select the magnifying glass icon.
For example, if your items require serial numbers, this will be the first field that you will see. Other fields may be Package number or Lot number. - A list of item tracking options will be displayed. Select the required item tracking details for your item. Select Show Details to confirm the selected option has the required item tracking details.
By selecting the field, you can also use the keypad to manually enter the tracking details. - When all fields have been completed, select the Save button at the bottom of the screen to save your tracking details.
Note: Expiry and warranty item tacking dates are unavailable at this time.
-
Once the required quantity has been reached, you will see the message ‘Item Complete’ and a Next button is displayed at the bottom of the screen.
-
Click Next to confirm that this item has been picked and move to the next item. Repeat the above steps until all Pick Items are complete.
-
When the last item has been picked, you will see a prompt confirming that the Pick is complete. You now have the option to either Post or Save, depending on your configuration,
-
Select Post to post the pick.
This will complete the Inventory Pick process in Wiise and the Pick will no longer be visible on your device. Only staff with a full Wiise licence will be able to post the pick. -
Select Save to save the Pick back to Wiise Desktop. The Pick will remain on your device in the Completed tab until it is posted from the Wiise desktop.
-
-
Congratulations! You have now completed an Inventory Pick.
What happens once I save or post a pick back to Wiise ERP Desktop?
Now that the task has been completed, it has been either posted or saved back to Wiise ERP Desktop.
If it has been posted:
-
The Quantity to Handle field in the tasks document has been updated to the expected number.
-
The posted command has been run.
-
The document has been moved to the Posted Inventory Pick Page.
-
The inventory amount has been updated.
-
If you have posted a partially complete pick, only the amount that has been completed will be posted back to Wiise ERP desktop.
-
For example, if a user picks 7 out of 10 items, 7 will post and the 3 will remain unposted until completed.
-
If it has been saved:
-
The Quantity to Handle field in the pick tasks document has been updated to the expected number.
-
All item tracking details have been saved back to the document.
-
The document can now be confirmed and posted from Wiise ERP Desktop.