Overview:
-
Request installation of the NDIS extension
-
Update the Wiise NDIS Setup page
-
Review the automatically created Job Queue entries
-
Set Up GST Posting Setup
Why Set Up NDIS in Wiise?
Setting up NDIS in Wiise enables you to manage NDIS participants, funding, and invoicing. Wiise supports accurate billing, compliance with NDIS requirements, and centralised tracking of services and payments.
Before You Begin
-
Ensure that users have been set up with the appropriate NDIS Permissions.
How to Set Up NDIS in Wiise?
Step 1: Request Wiise Support to install the NDIS extension
- Contact Wiise Support: Send an email to support@wiise.com requesting to install the NDIS extension in your environment. Provide the tenant ID and environment name where the extension needs to be installed.
- Wait for confirmation: Wiise Support will notify you once the NDIS extension has been successfully installed.
Step 2: Complete the Wiise NDIS Setup page
Once the extension is installed:
- Search for Wiise NDIS Setup on the top right-hand corner of the page. Select the relevant link and the page displays.
- Configure your NDIS preferences and settings:
- NDIS Bill-to Customer: This field identifies who is responsible for paying the invoice for NDIS services. You can set up NDIA as a customer so you can record payments made by the NDIA for your participants.
Note: When completing the customer card setup for your participants, when you select NDIS Participant as the customer type, Wiise uses the NDIS Bill-to Customer field to ensure invoices are directed to the correct payer. - Def. Gen. Prod Posting Group: The default General Product Posting Group specified in this setup will be used when the NDIS product catalogue is imported as items into Wiise.
- Def. GST Prod. Posting Group: The default GST Product Posting Group specified in this setup will be used when the NDIS product catalogue that you import as items into Wiise.
Step 3: Job Queue Entries
Note: When you activate the NDIS PRODA device connection, Wiise automatically creates the required Job Queue Entries.
These job queues run in the background to maintain the NDIS connection and retrieve payment notifications. You do not need to manually create or configure them.
Here are the two automated job queue entries set up:
Notification Event Job Queue
This job checks for notifications from NDIS, including payment status updates for submitted NDIS invoices. 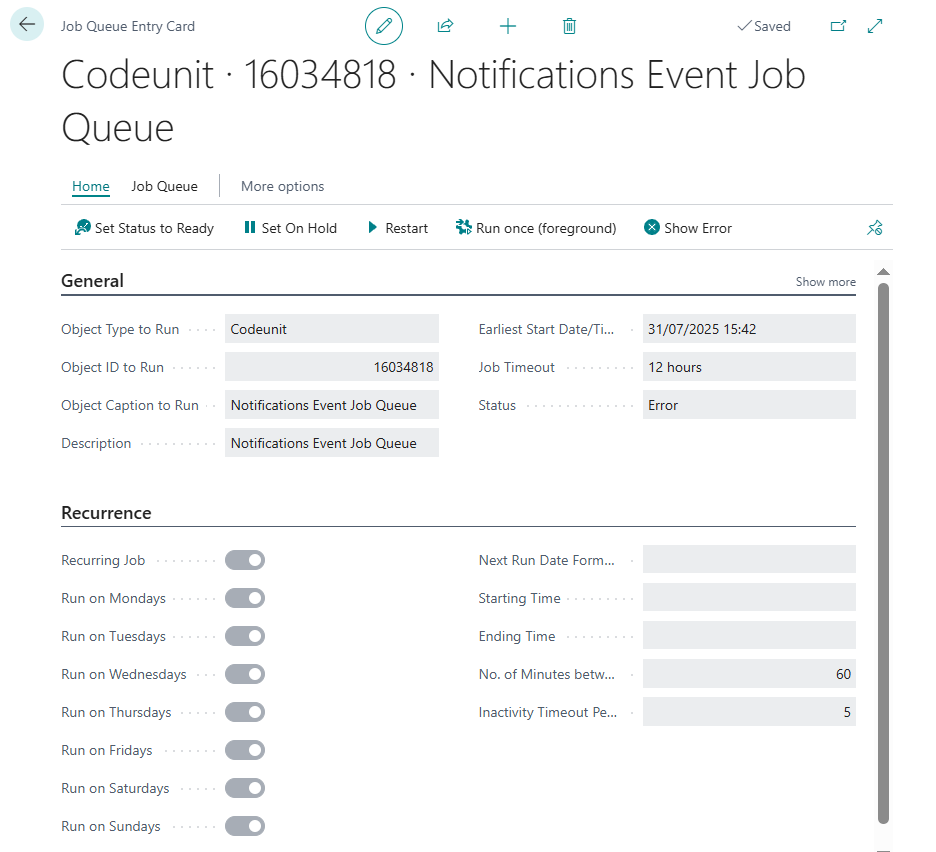
Note: This job polls NDIS regularly to determine whether payment requests have been processed. When a payment is detected, users can proceed with remittance processing.
Refresh Device
This job prevents device expiration and updates the status on your NDIS Connection Dashboard.
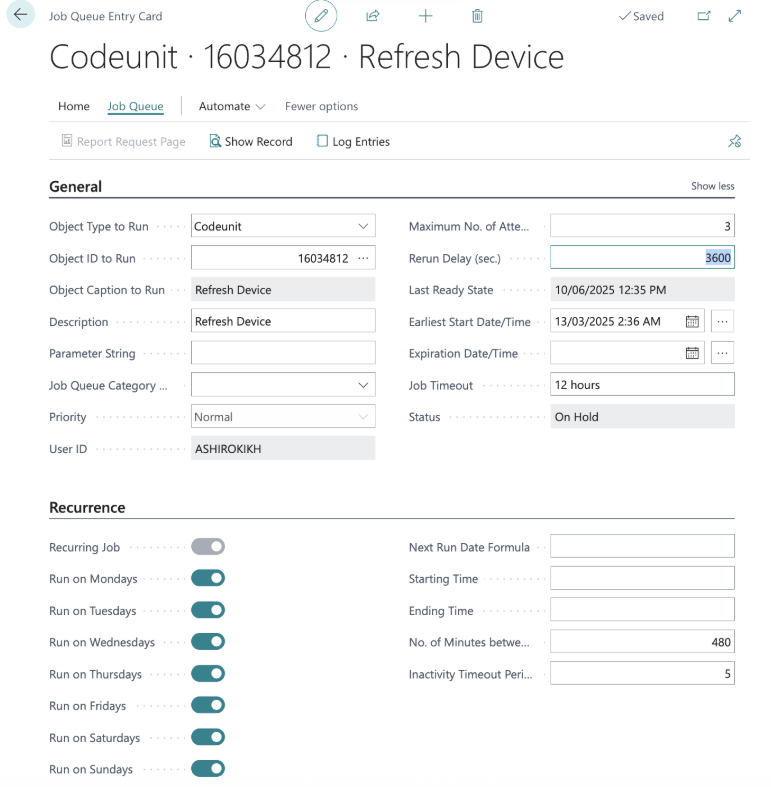
Note: This prevents the device authentication from expiring and ensures the NDIS connection remains active.
Note: In earlier versions, users needed to manually create these Job Queue Entries. This step is no longer required becuase the system automatically creates them when the NDIS PRODA device connection is activated.
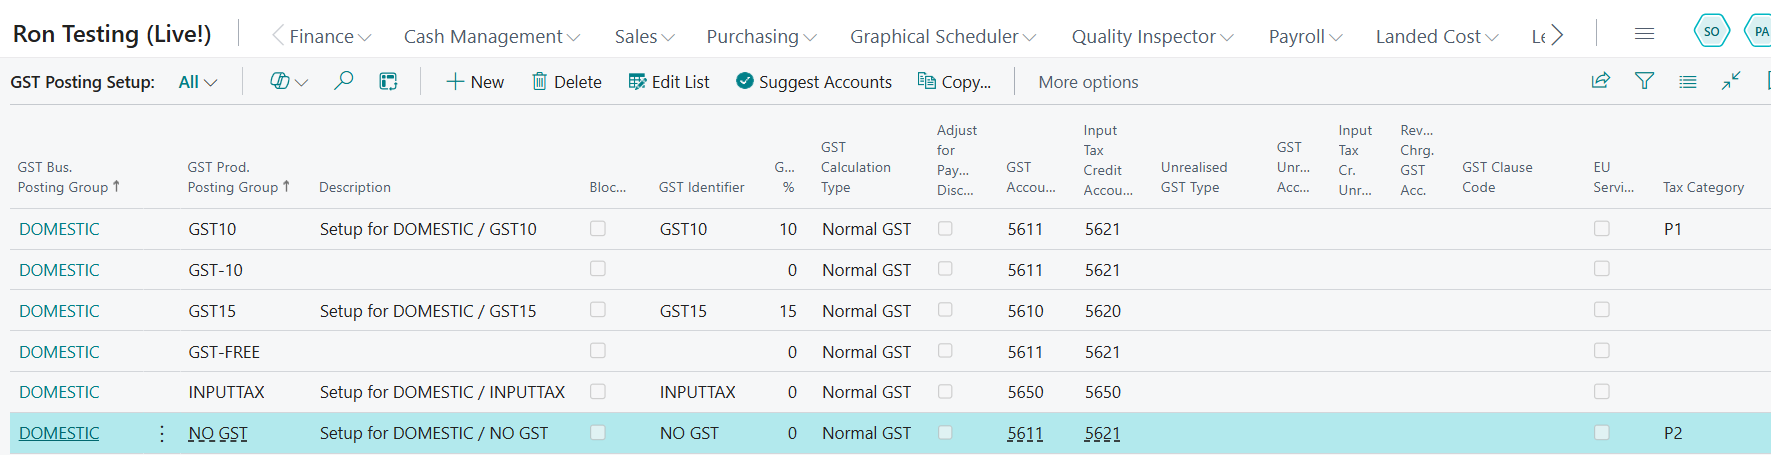
Step 4: Set up GST Posting Setup
You'll need to set up the Tax Category field on the GST Posting Setup as this determines how transactions are treated for GST reporting.
-
Search for GST Posting Setup on the top right-hand corner of the page. Select the related link and the page displays.
-
Configure the Tax Category fields in the GST Posting Setup:
-
Select Edit List. Then, update the valid Tax Category.

-
The valid Tax Category you can enter are:
-
P1: Tax Claimable (10%) / GST10
-
P2: GST Free / NO GST
-
P5: GST Out of Scope
-
-
You’ve completed the Wiise for NDIS setup.
What’s next?
Find out how to set up NDIS Proda Connection.
Need more help?
No problem, that's what we're here for. Reach out to support@wiise.com anytime you can't find what you're looking for.