Overview:
- Complete a Warehouse Receive and Put Away using Ontime
Why use Ontime for Warehouse Receive?
Warehouse workers who complete receiving and put-away tasks directly in the OnTime app, make the process of handling shipments effective and efficient. A warehouse or landed cost receipt can be created either in the Wiise ERP desktop or directly in OnTime, allowing goods to be received and put away in one streamlined workflow.
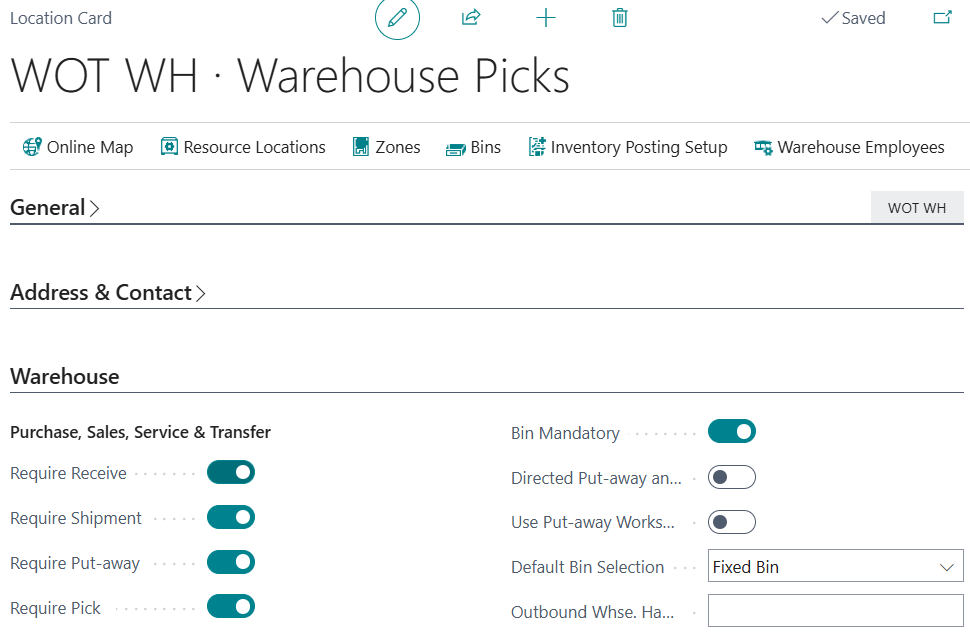
Note: Require Receive must be enabled on your Location Card in Wiise ERP desktop to use the Warehouse Receive process and complete the full receive and-put-away workflow in OnTime.
Note: In the OnTime app, you can create a warehouse receipt from a released purchase order in your Wiise ERP desktop. When you select the released purchase order in OnTime, the system prompts you to Create Receipt.
Find out how to view your released purchased order in OnTime and set up a warehouse receipt.
How to use Ontime for Warehouse Receive?
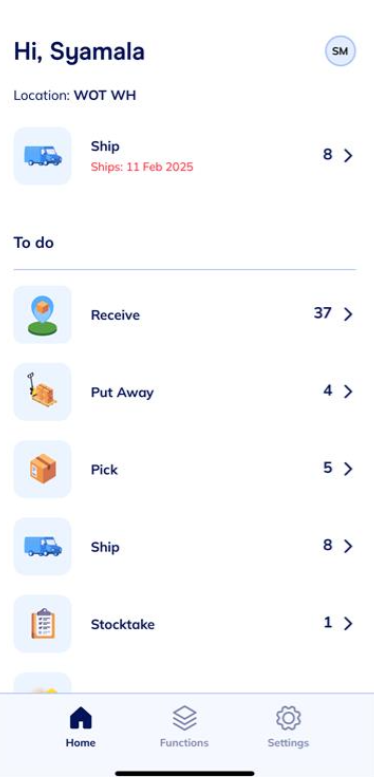
- Login to your OnTime app. You’ll be directed to your Home screen.

- Select Receive on your To do section.
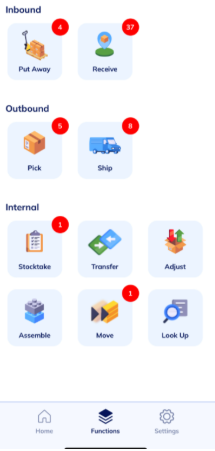
- If you’re on the Functions menu, select the Receive tile in the Inbound section.

Note: The number indicated against the Receive tile shows the total tasks to complete. - The Receive page displays.

- Select Open Warehouse on the Warehouse Receive tile as you’ll be doing the complete process of receive and put away for your complex warehouse process.
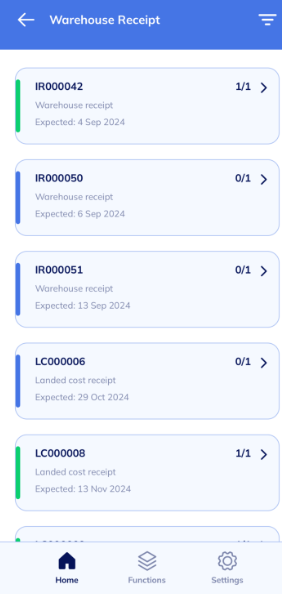
- The warehouse receipts, landed cost receipts and released purchase orders display.

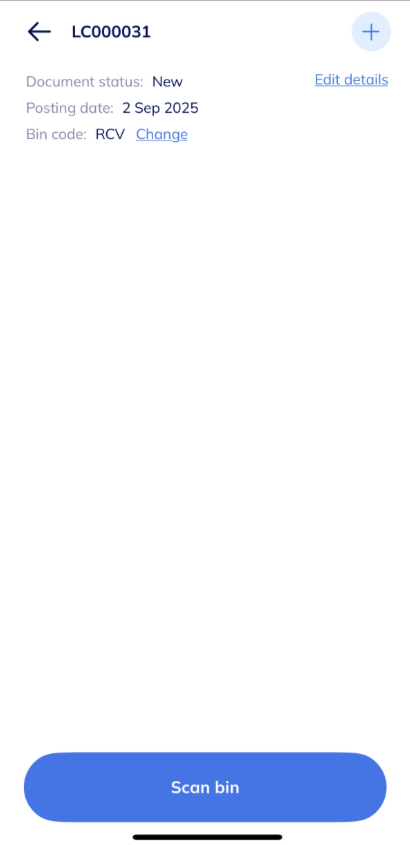
- Then, select the Warehouse receipt or Landed cost receipt, you wish to work on in OnTime.
- The Scan bin page displays. Select Scan bin.

- Use your device camera to scan the receive bin.
Note: The camera captures the scanned details and updates your receive bin.
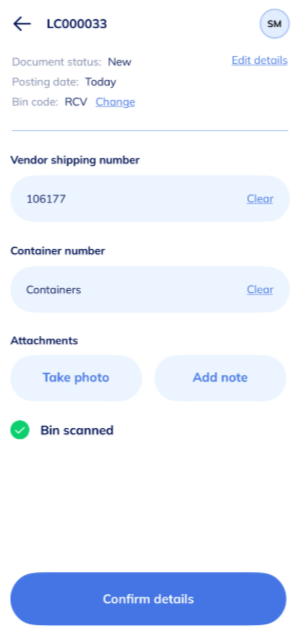
- Fill in the following fields:
- Vendor shipping number: Key in the corresponding vendor shipping number. This is optional.
- Container number: This field is displayed when you’ve enabled landed cost in the Wiise company. Otherwise leave this blank.
- You have an option to include attachments by taking a photo on your device.
- Add a note.
- Select Confirm details to save your settings.
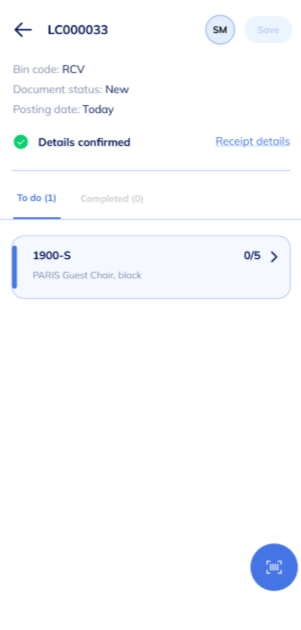
- A message displays Details confirmed. You can select the Receipt details link to view the details you’ve confirmed.

Note: The system automatically assigns the task to you. You can see your initials on the top right-hand corner of the page. - Select the related item task on the To do list to action the receive. The item task displays.

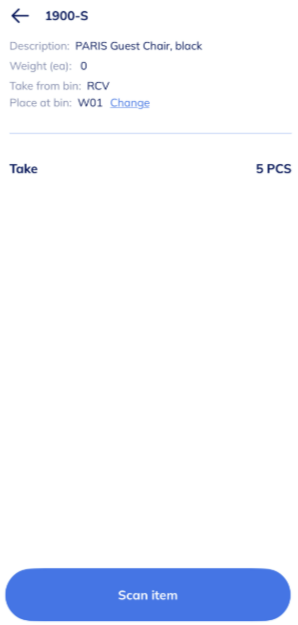
- View the item description, weight, unit of measure and the expected number to receive.
- Then, select Scan item and confirm the total expected numbers to receive.
- Update the items to receive by selecting the – or + button.
- Select Confirm when you’ve made your selection.
- Continue to scan the other items to complete the task.

- A message is displayed to confirm that the receive is complete. Select Save to save in Wiise ERP desktop or select Dismiss to cancel the save.
- A confirmation message displays that saving was a success.

- Select OK to continue.
Note: The Save action automatically turns into a Post action on the top right-hand corner of the page. - Select and confirm the Post.

- When the receipt is posted, a message displays confirming if you want to open put away.

- Select Open to activate the put away option in the OnTime app.
- The warehouse put away tasks displays.

Note: The completed warehouse receipt in the Receive section disappears.
Note: The warehouse put away task appears in the Put Away section.
Note: The blue tiles indicate they are ready for action.
Note: The Place option remains unavailable and greyed until the Take process is completed.
Note: You may be asked to scan an item twice. The first scan is for item validation, and the second scan is for confirmation before entering the quantity or placing the item.
Note: If a barcode does not scan, you can manually enter the item number using your device’s keyboard. For non-barcoded items, consider setting up an internal barcode or cross-reference system to ensure receiving and picking can continue without delays.
Note: Our hardware scanners support all common barcode types, including full 13-digit EAN-13 codes - Select a task to action. The Take process commences.

- Select Scan item. Then, update the number of items handled.
Note: After scanning your items, you’ll see a page where you can select which bin to place them in. You can either receive all items into the same bin or split them across different bins. - Select the – or + button to handle the number of items to Take. In this instance, you’ll select all items for Take.
- Select Confirm to continue.
- Repeat the process for the other Take action items.
- When you’ve made your selection, select Confirm to continue.

Note: When you’ve completed the tasks, they disappear from your list and display Take Complete. - The Place tasks are enabled for you to complete now.
Note: If OnTime does not prompt for the Place step after a Take from the receiving bin, the system may be configured to automatically place items into the destination bin. This setting speeds up processing but removes the manual confirmation step. To change this, check your Wiise Warehouse OnTime configuration in Wiise ERP.
Note: Use the same approach for the Place process as you did for the Take process. Once both the Take and Place processes are completed, you can register the put-away as complete.
- Select Register to push this data to Wiise ERP Desktop.
- A confirmation displays that registering was a success. Select OK to continue.

- You’ll be directed back to the Put-Away list.
- You’ll notice that completed and registered tasks disappear from your Put Away list.
- You’ve completed warehouse receive and put away with OnTime.


Note: When the accounts payable team receives the invoice, the team will need to invoice the purchase order and make a payment in Wiise ERP desktop.
What's next?
Find out how to do a warehouse pick with OnTime.
Need more help?
No problem, that's what we're here for. Reach out to support@wiise.com anytime you can't find what you're looking for.