Overview:
- Use a Cash Receipts Journal in Wiise
- Add Payment lines
- Create a Direct Debit file
- Post the Direct Debit payments
Why Create a Direct Debit File?
Setting up a cash receipts journal is an accounts receivable process that can be used to record the collection of payments from your customers. Using the Wiise direct debit function, you can withdraw money owed to your business from your customers nominated bank account.
Note: To use the Direct Debit function in Wiise, your customer must complete a Direct Debit Authority Form, either your business’s approved form or the bank’s template authorising direct withdrawals from their account.
How to Add Payment Lines in Cash Receipts Journal?
When you've set up direct debit for your bank account and set up your customer’s direct debit bank account, you can create a direct debit file based on entries in the cash receipts journal.
There are two ways to create a direct debit payment file from your cash receipts journal. You can use the Suggest Customer Payment function to automatically add invoice amounts that are due based on the options you select during the process, or you can manually add lines to your Cash Receipts Journal.
Add payment lines with Suggest Customer Payment option.
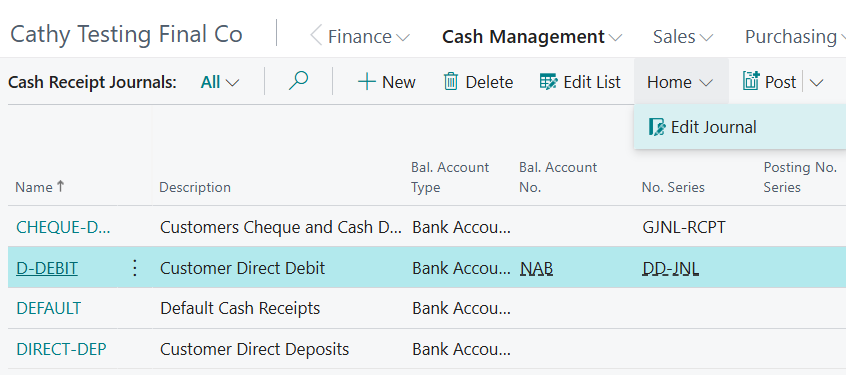
- Start from the Wiise landing page (role centre) and select Cash Management. Then, select Cash Receipts Journal.

- You’ll see a list of journal batch names for cash receipts journals.

- Select the cash receipts journal batch name that you’ve set up for direct debit collection. You can do this by selecting the Name of the cash receipts journal. Alternatively, you can first highlight the row of the payment journal, then select the Home menu, and then select Edit Journal.

Note: From the cash receipts journals edit task view, you can suggest customer payments. This will create payment suggestions lines in the cash receipts journal. - Select the Process menu. In the drop-down option, select Suggest Customer Payments.

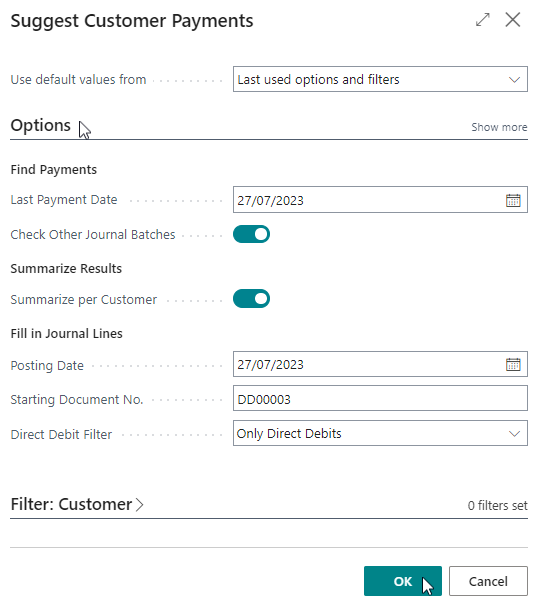
- The Suggest Customer Payment prompt opens. Fill in the fields in the Options section.
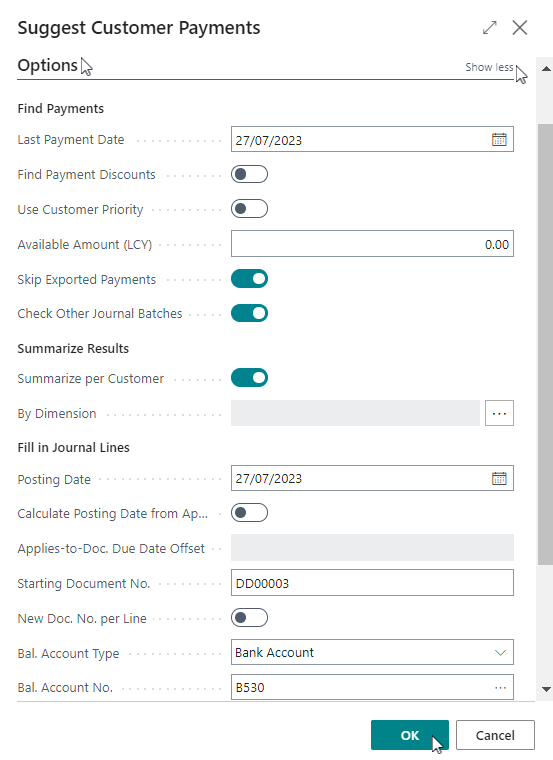
- Select Show more from the Options section to see more fields.

- Fill in the following fields:
- Last Payment Date: The payment date for the last payment completed by customers.
- Summarise per Customer: When enabled, this toggle creates one line for each customer. If disabled, the payment lines show up as one line per invoice.
- Add the Bal. Account Type and Bal. Account No. for the bank account you’ve enabled for direct debit.
Note: As you only want direct debit payment from the customer electronically, update the Direct Debit Filter to Only Direct Debits. - Select OK to complete the process.
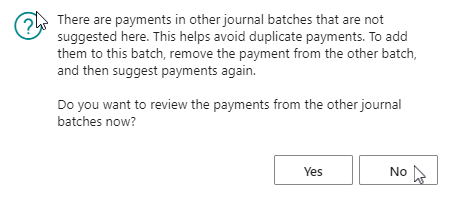
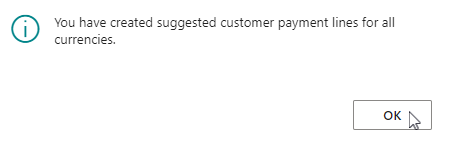
- When processed, you’ll see the following prompt.

- Select OK to continue.
- Select OK to continue.
- The next prompt asks if you want to review the payments from the other journal batches.
- Make your selection. Select Yes or No.
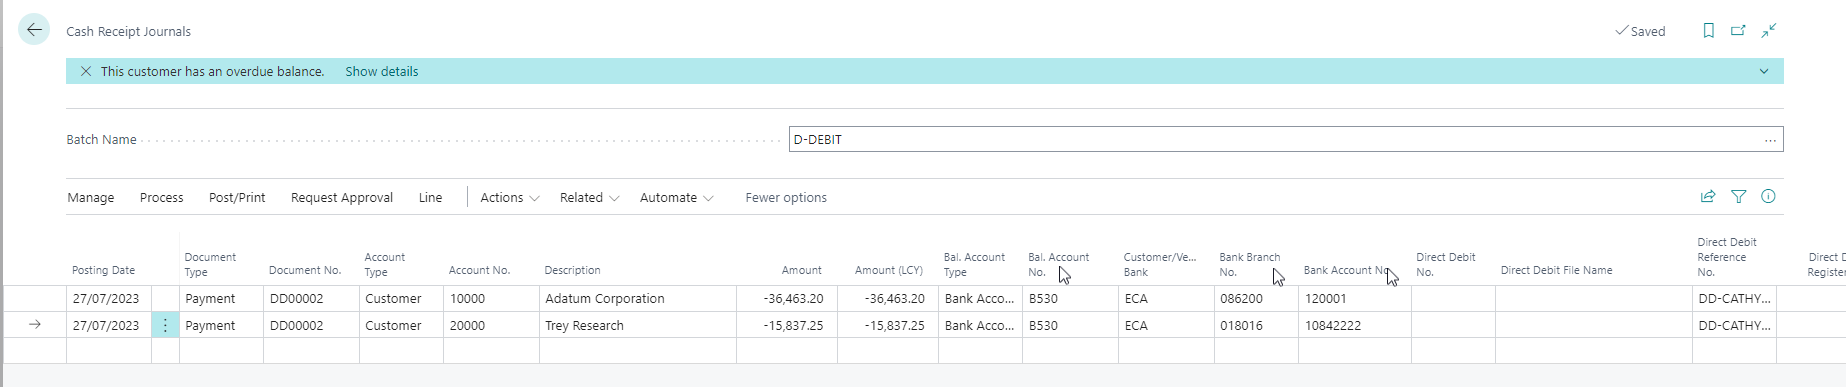
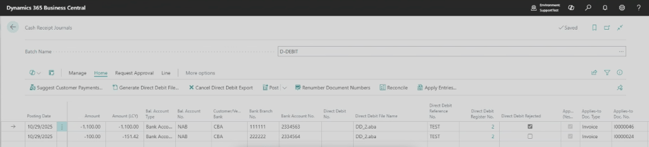
Note: Wiise displays customer payments that match your selected options on the Cash Receipts Journal lines.
Note: You’ll notice that your direct debit bank accounts and the customer’s direct debit bank account is populated on the cash receipt journal lines so that customers payment is transferred electronically to your bank account when processed.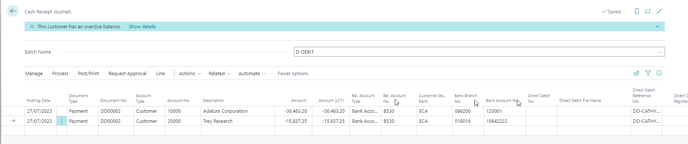
- Make your selection. Select Yes or No.
- You’ve completed creating the payment lines using the Suggested Customer Payments option.


Add payment lines manually
- Start from the Wiise landing page (role centre) and select Cash Management. Then, select Cash Receipts Journal.
- You’ll see a list of journal batch names for cash receipts journals.
- Select the cash receipts journal batch name that you’ve set up for direct debit collection. You can do this by selecting the Name of the cash receipts journal. Alternatively, you can first highlight the row of the cash receipts journal, then select the Home menu, and then select Edit Journal.
- In the new cash receipts journal line, fill in the row for each column.
- Set the Account Type as Customer.
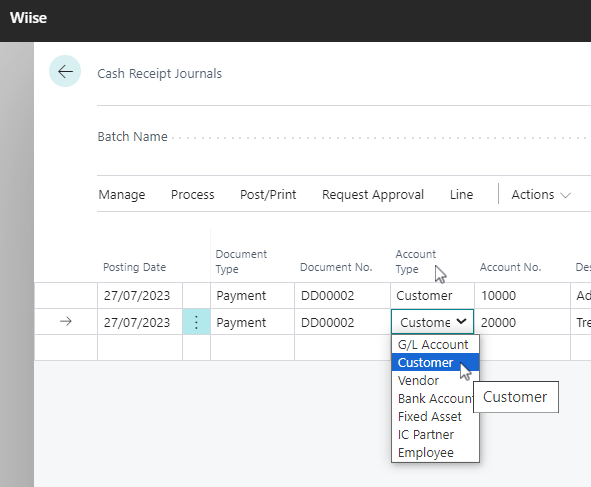
- Account No.: Select the drop-down menu. Then, select the appropriate customer number from the list.
Note: When you create a Direct Debit payment file from the Cash Receipts Journal, the Customer Bank Account field is automatically pre-filled with the bank account that has Authority Held enabled for that customer for direct debit collections.
Note: The above-mentioned fields need to be filled in as it provides the customer bank account details for the direct debit file.
- Set the Account Type as Customer.
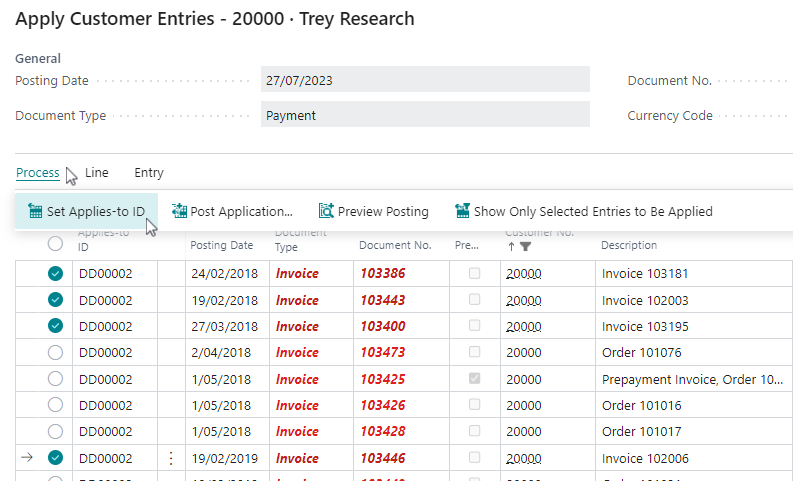
- Select Home. Then, select Apply Entries.

- The Apply Customer Entries page displays.
- Select the entries you want to include in this Direct Debit process.

Note: The Applies-to ID field will be blank initially and is updated with the journal document number after you include the customer entries in the current Direct Debit process. - Select Set Applies-to-ID.
- This process automatically fills in the Applies-to ID field.
Note: You can view the total of the applied entries in the Amount column on the journal line. - You’ve completed the manual process.

Note: When you’ve finished entering the cash receipts journal lines, you can create the direct debit file.
How to Create a Direct Debit file?
Note: Not all users have permission to generate Direct Debit files. If you require permissions, reach out to your team to update your access in User Setup.
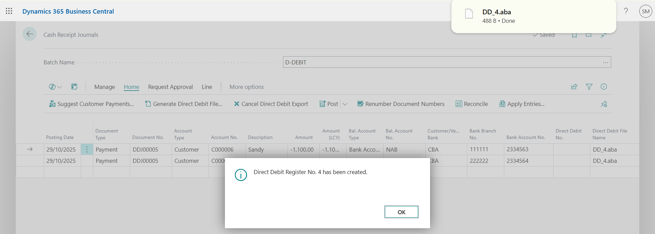
- In your Cash Receipts Journal menu, select Home. Then, select Generate Direct Debit file.

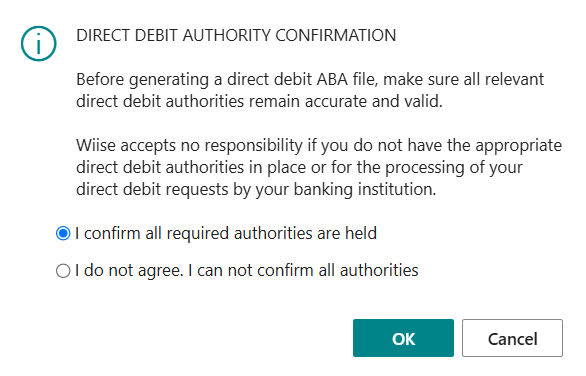
- The Direct Debit Authority Confirmation prompt displays.

Note: Ensure that all relevant direct debit authorities remain accurate and valid before you proceed to generate the direct debit ABA file. - Select I confirm all required authorities are held or select I do not agree. I can not confirm all authorities.
- Select OK to continue or Cancel to stay on the page.
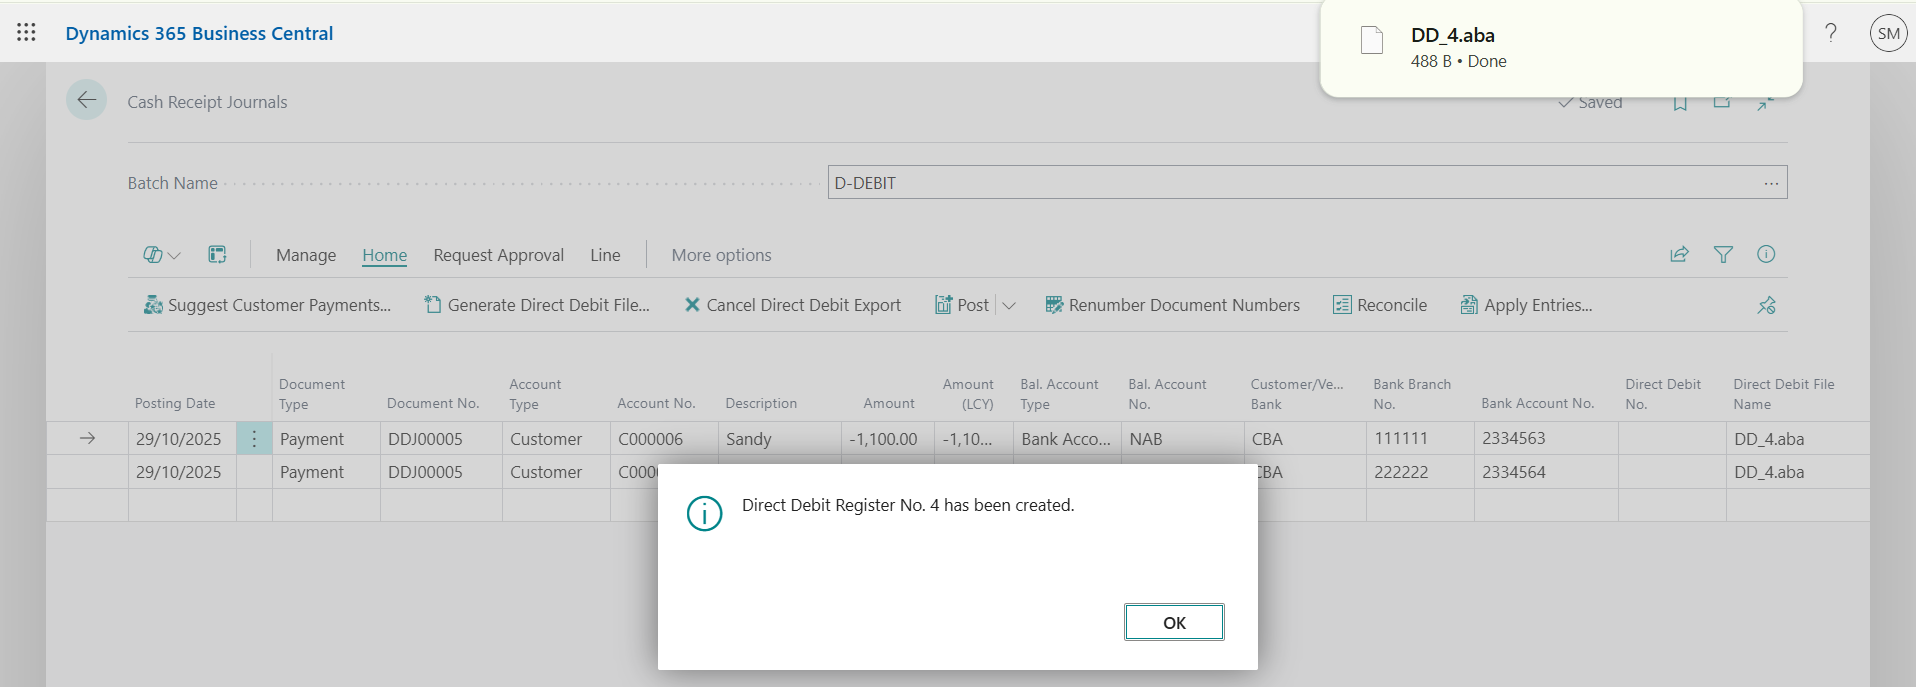
- Wiise generates the Direct Debit ABA file based on the line items in the journal and auto downloads it to your desktop.
- Select OK to close the process.
- The system fills in the Direct Debit File Name column with the downloaded document and locks each journal line.
Note: You'll need to check where your browser saves downloads for the files. The file is named DD_xx.aba (xx is a sequence number that goes up with each export). - Upload the downloaded direct debit ABA file to your online banking for processing.
- You've used a Cash Receipts Journal to create the direct debit file.

Note: Direct Debit transactions can take up to 48 hours (about 2 days) to succeed or fail so you may need to wait before you know the outcome of each transaction.
How to Post the Direct Debit Payments?
Note: If any transactions are rejected by your bank, usually due to incorrect bank details or insufficient funds, mark them as rejected in the Cash Receipts Journal and record the rejection reason. Follow up with the customer to resolve the issue, update their details in Wiise, and then reprocess the journal line.
- Update the Direct Debit Rejected column accordingly.
Note: Wiise does not allow you to post any journal lines flagged as rejected. If other approved lines are posted together with rejected ones, the rejected lines will disappear from the journal but will reappear in your Cash Receipts Journal when you run the next batch. - Select Post and Print.
Note: When you post, you’re recording the receipt of payment against each of the customers. The customer ledger entry isn’t updated when a transaction is rejected. - A message displays to confirm if the journals line have been appropriately updated with the correct Direct Debit Status.
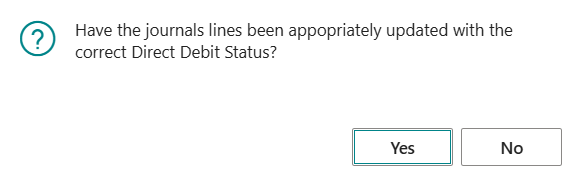
- Select Yes to continue.
- A message displays to confirm if you want to post the journal lines.
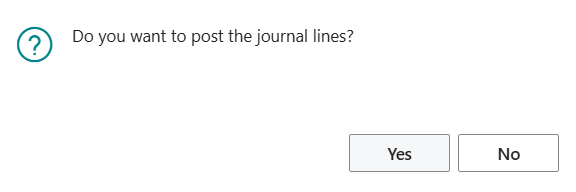
- Select Yes to continue or No to stay on the page.
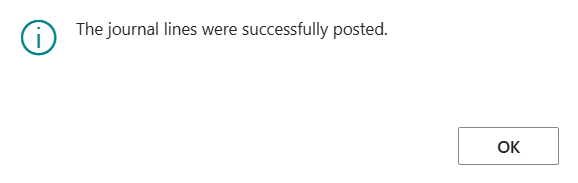
- A message confirms that the journal lines were successfully posted.

- Select OK to close the process.
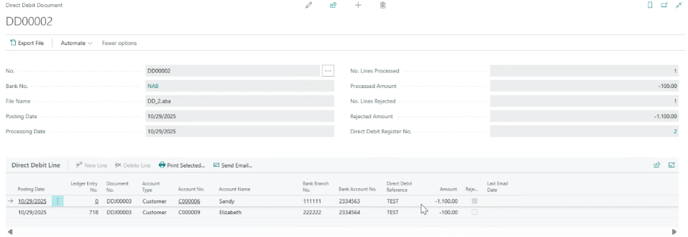
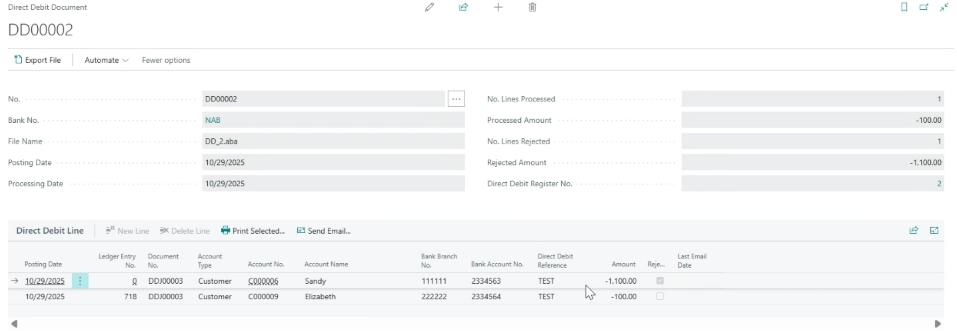
Note: Each time you create a Direct Debit file, a Direct Debit list is created. You can search for Direct Debit List from the top right-hand corner search icon to see a list of the processed and rejected lines.
- You've posted direct debit payments in the cash receipts journals.


What's next?
Now that you’ve posted the Cash Receipts Journals, send confirmation emails to your customers to let them know whether their payments were successful or rejected.
Need more help?
No problem, that's what we're here for. Reach out to support@wiise.com anytime you can't find what you're looking for.