Overview:
-
Create a Wiise project card and link it to a customer
-
Add Wiise project tasks and set the right task type for each one
- Structure tasks into headings and subtotals so your project reports cleanly.
- Add planning lines to set budget and billable figures for each task.
Why Set Up Wiise Projects and Tasks?
A well-structured project gives you accurate cost and revenue figures at the task level, so you can see where a project is making or losing money. Setting tasks up correctly from the start means your budgets, actuals, and billing all line up without rework later.
Before you begin
- The customer you're billing must already exist in Wiise.
- You need the project's budget figures and task breakdown ready to enter.
- Your project posting groups must be configured if you plan to post costs to this project.
How to Set Up Wiise Projects and Tasks?
Set up the Project
- Search for Projects on the top right hand corner of the page. Seledt the related link and the page displays.

- Select + New. A blank project card displays.
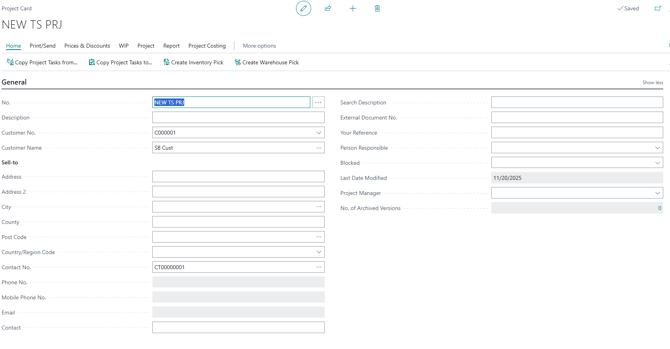
- Fill in the required sections:
- In the No. field, enter a project number, or let Wiise assign one from the number series.
- In the Description field, enter a clear name for the project.
- In the Customer Name field, select the customer you're delivering the project for.
- In the Person Responsible field, select the team member who owns the project.
- In the Project Manager field, select the project manager if this differs from the person responsible.
- Note: Leave Blocked empty while the project is active. Setting it to Post or All stops further entries against the project.
- Wiise saves the card automatically. Check the Last Date Modified field updates to confirm.

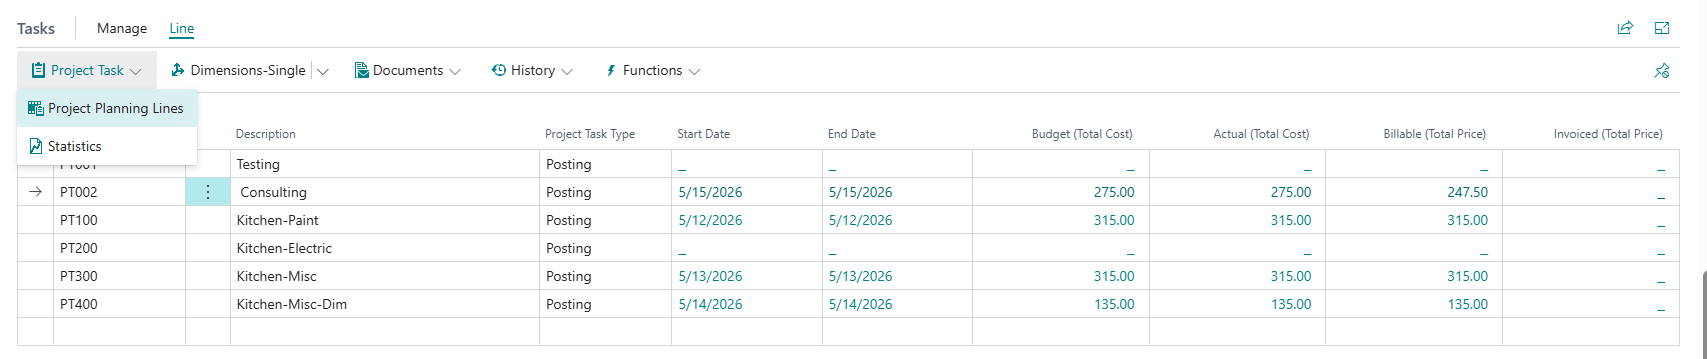
Add project tasks
Project tasks sit in the Tasks section on the project card. Each task tracks its own budget, actual cost, and billable amount.
- In the Tasks section, select New.
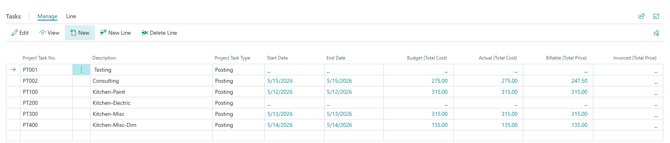
- Fill in the required fields:
- In the Project Task No. field, enter a code for the task, for example PT100.
- In the Description field, enter what the task covers.
- In the Project Task Type field, select the type that fits the task.
Note: The Project Task Type controls whether a task holds figures or summarises the tasks around it.
Caution: Selecting the wrong type is the most common reason project totals don't add up.
Project Task type What it does Posting Holds actual entries. Use this for any task you post costs or sales against. Heading A label only. Use it to group related posting tasks. It holds no figures. Total Sums a range of tasks you define in the Totaling field. Begin-Total Marks the start of a group of tasks to be subtotalled. End-Total Marks the end of the group and shows the subtotal for everything since the matching Begin-Total.
Warning: Only Posting tasks accept entries. If you try to post a cost or sale against a Heading, Total, Begin-Total, or End-Total task, Wiise blocks it. - To group tasks, add a Begin-Total task above the group and an End-Total task below it.
- In the End-Total task, set the Total field to the range of task numbers you want to subtotal, for example PT100..PT400.
- Advice: Use a consistent numbering scheme for task codes, such as PT100, PT200, PT300. This keeps tasks in a predictable order and leaves room to insert new ones later.
- Review the Budget (Total Cost), Actual (Total Cost), Billable (Total Price), and Invoiced (Total Price) columns to confirm your figures roll up as expected.
Tip: Use Copy Project Tasks from on the Home menu to reuse a task structure from an existing project. This saves rebuilding a standard breakdown for every new job.
Plan your project tasks
Planning lines are where you set what a task is expected to cost and what you'll bill for it. Each Posting task can have one or more planning lines. 2
The figures you enter here roll up into the Budget (Total Cost) and Billable (Total Price) columns on the task list.
- On the task list, select the Posting task you want to plan.

- Then, select Line. Select Project Task. From the drop-down menu, select Project Planning Lines. The planning lines for that task open.
Note: Alternatively, after you've set up all project tasks, you can select Project, then Project Planning Lines. The planning lines for the tasks open.
- Fill in the required fields:
- Select New to add a planning line.
- In the Line Type field, select how the line behaves.
Note: The Line Type field controls whether a planning line feeds your budget, your billable amount, or both.
Line type What it does Budget Records the expected cost only. It feeds Total Cost and the task's Budget (Total Cost), but leaves the price columns empty. Billable Records the price you'll invoice only. It feeds Line Amount and the task's Billable (Total Price), but leaves the cost columns empty. Both Budget and Billable Records cost and price on one line. It feeds both the budget and billable columns. Use this when the same piece of work is both a cost to you and something you bill. - In the Planning Date field, enter the date you expect the work to happen.
- In the Type field, select Resource.
- In the No. field, select the resource.
- In the Quantity field, enter how many hours the resource is expected to work on the project task.
- In the Unit Cost field, enter the cost per unit (hour). Wiise multiplies it by the quantity to give the Total Cost.
- In the Unit Price field, enter the price you'll charge the customer per unit. Wiise multiplies it by the quantity to give the Line Amount.
- Note: A Budget line never reaches the customer's invoice, and a Billable line never appears in your cost figures. Use Both Budget and Billable when one line should do both, so you don't have to enter the work twice.
- Tip: From the planning lines page you can select Create Sales Invoice or Create Project Journal Lines to turn your plan into an actual invoice or posting once the work is done.
- Return to the task list and check the Budget (Total Cost) and Billable (Total Price) columns now show your planned figures.

Check actual costs against your plan
The Budget and Billable columns show what you planned. The Actual (Total Cost) column shows what's actually been posted against the task. These are two different things, and they drill into two different places.
- On the task list, select the figure in the Budget (Total Cost) or Billable (Total Price) column to drill into the planning lines behind it. You can edit these.
- Select the figure in the Actual (Total Cost) column to drill into the Project Ledger Entries behind it.

Note: Project ledger entries are posted history and are read-only. You can't edit an actual figure directly. It only changes when you post a project journal or a purchase against the task. To correct an actual, post an adjusting entry rather than trying to edit the figure. - You now know how to set up a project and tasks in Wiise.

What's next?
Find out how to Set up Timesheet Project Mapping.
Need more help?
No problem, that's what we're here for. Reach out to support@wiise.com anytime you can't find what you're looking for.