
Overview:
- Connect GTM IQ to your data.
- Run the setup wizard.
- Build your business context.
Note: This section explains how to sign into GTM IQ with Business Central. Find out how to sign in to GTM IQ without using Business Central.
Why this matters?
GTM IQ builds your company profile from your Business Central data, your website, and anything you add to business context. Every agent, including best customers, ideal customer profile, prospecting, and monitoring, reads from this same profile, so what you add during setup directly shapes what each agent can tell you later.
Before you begin
-
You need a Dynamics 365 Business Central account
-
You must be a Wiise customer to use GTM IQ.
-
Your super admin must connect to Business Central first and grant permissions for GTMIQ to read your data before anyone else on the team can sign in.
Note: GTM IQ only reads your data. It never writes back to Dynamics 365 Business Central unless you take an explicit action.
How to Sign in to GTM IQ with Business Central?
Setup happens in three stages, in this order:
-
Your super admin connects Business Central first;
-
Then, you run the setup wizard;
-
Then you build out your business context.
Once all three are completed, GTM IQ has what it needs to start showing you useful output.
Step 1: Connect Business Central as Super Admin
- Sign in to GTM IQ as the super admin.
- Connect Dynamics 365 Business Central and grant the permissions GTM IQ needs to read your data.
- Select the environment and company the workspace will use.
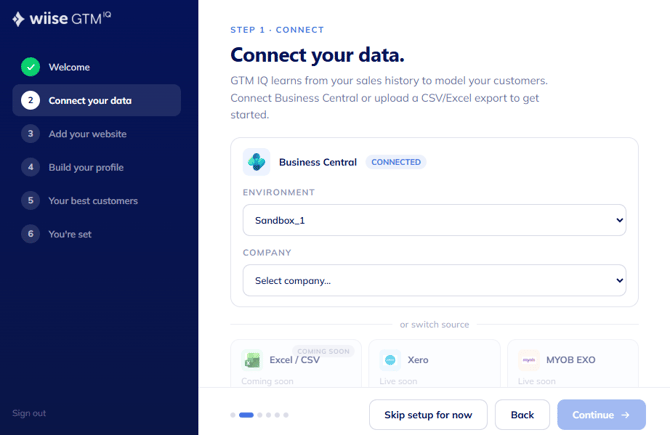
- Your workspace is connected. The rest of your team, and the super admin if they're continuing on, can now move to the setup wizard below.
Step 2: Run the Setup Wizard
Tip: The wizard appears the first time you log in and won't appear again on later logins.
It works the same way whether you're the super admin continuing on or a team member signing in for the first time.
Note: If the wizard keeps appearing on later logins, please contact support@wiise.com
- Sign in with your Microsoft account.
- Connect your data source: Dynamics 365 Business Central, Xero, or (from 30 July 2026) an Excel upload.
- Confirm your website when GTM IQ suggests it.
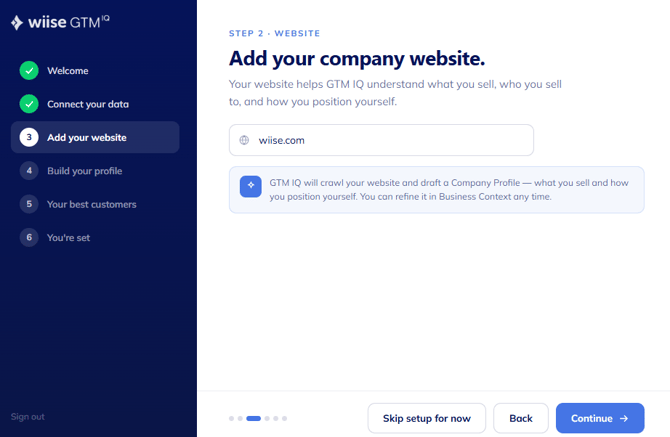
Warning: Check the suggested website carefully before confirming. GTM IQ reads this site to start understanding your business, so an incorrect URL produces an incorrect profile.
- Review the customers GTM IQ has identified as your best, based on your data.
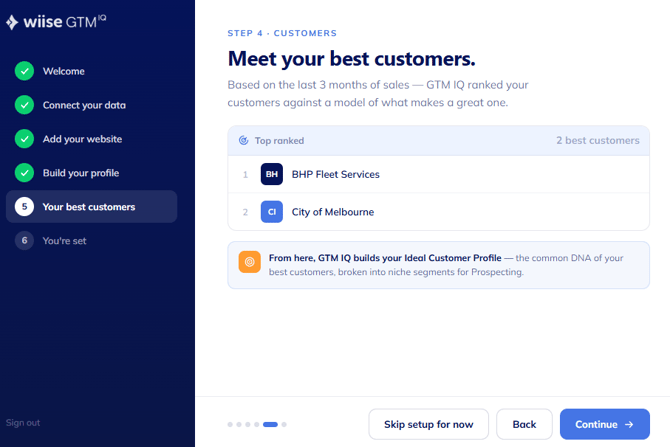
-
Select Finish to land on the Business context page.
Note: With the wizard complete, GTM IQ has a first-pass profile built from your data and your website. The next stage is to sharpen that profile with business context.
Step 3: Build Your Business Context
The Business context page is where the real setup happens. Everything you add here feeds your company profile, which nearly every GTM IQ agent draws on.
- Go to the Business context page.
- Add business documents, such as brochures, capability statements, or pitch decks.
- Add external links, such as your LinkedIn page or competitor pages.
- Add free text notes covering anything only you know, such as your positioning or your sweet-spot customer.
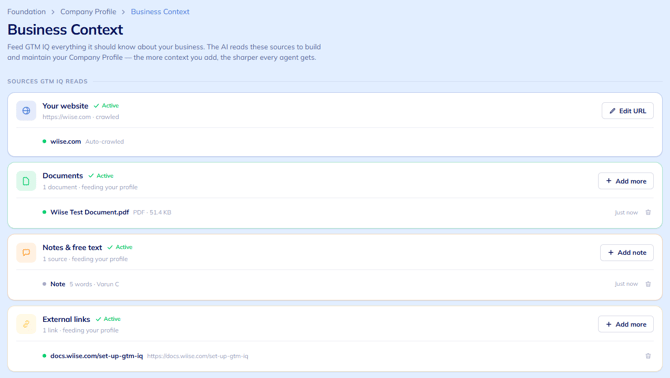
- You now know how to set up GTM IQ.
Advice: Treat your company profile as a living thing, not a one-off setup step.
-
Add to it whenever you land a new kind of customer or enter a new market.
-
Answer the clarifying questions GTM IQ asks once your profile is generated.
- Check the coverage indicator to see where your profile might be thin.
Tip: A few minutes spent answering GTM IQ's clarifying questions pays off across every report the agents produce.
What's next?
Find out how to sign in to GTM IQ without Business Central.
Need more help?
No problem, that's what we're here for. Reach out to support@wiise.com anytime you can't find what you're looking for.