Overview
Learn how to use Wiise Warehouse OnTime to prepare and compete stocktakes and cycle counts.
- The Stocktake Process
- Why use OnTime to complete a stocktake?
- How to create a stocktake in Wiise Desktop to send to OnTime
- How to complete a stocktake using Wiise Warehouse OnTime
- Can I complete more than one stocktake before sending it?
- What happens once I save a stocktake back to Wiise ERP Desktop?
The Stocktake Process
-
Create a Physical Inventory Order in Wiise Desktop
-
Click on New Device Recording
-
Open the OnTime app and select Stocktake
-
Select a Stocktake Recording from the list
-
Count the items
-
Save the Stocktake Recording back to Wiise

Why use OnTime to complete a stocktake?
A stocktake is a process of physically counting and verifying the quantity of inventory in a warehouse. Completing stocktakes is crucial for maintaining accurate inventory records, identifying discrepancies, preventing stockouts or overstocking, and optimising business operations.
With Wiise Warehouse OnTime, you can optimise this process by eliminating the need to prepare and print physical count sheets which then need to be transposed back into Wiise. Instead, you create an electronic version of the count sheet a handheld device. By recording counts electronically, you eliminate the risk of data entry errors when entering handwritten counts.
How to create a stocktake in Wiise Desktop to send to OnTime
A stocktake is created from a Physical Inventory Order. The Physical Inventory Order can be created for all items for a full stocktake, Physical Inventory Counting Period for a cycle count, or filtered to a subset of items or bins for a spot check or ad-hoc count.
-
From the Physical Inventory Order, select the Home menu
-
Select New Device Recording…
-
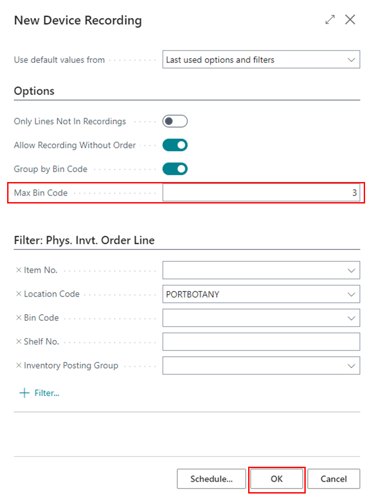
On the report filter screen, specify the number of bins that each Stocktake Recording should contain in the Max Bin Code.
-
Applying any filters that may be required, ie Location Code.
-
Select OK.
How to complete a stocktake using Wiise Warehouse OnTime
-
On the Home Screen, select Stocktake. (You can also find this on the Functions page.)
-
You will now see a list of Bin Codes.
The Bin Code reflects the first bin code that is contained within each Stocktake Recording. The list is sorted alphabetically. -
Select the stocktake you would like to complete.
This will open the stocktake and check it out to you. Other users won't be able to work on it. If you open a stocktake by accident or need to return this to the list to be worked on by another user, this can be done on the Wiise Desktop. Read more here How to remove a task from a team member in Wiise Warehouse OnTime. -
You will now have an item list containing bins and items.
This may be just for one bin, or it may reflect items contained within a number of bins, depending on how the Stocktake Recording was set up. -
Select an item tile from the list and go to the correct bin. (You can also scan the barcode on an item to open directly to the item count screen.)
- If the item requires item tracking (serial or lot number) to be added, follow these steps:
- For non-serialised items, follow the following steps.
- You will see a blue Add item tracking button at the bottom of the screen.
- Select the Add item tracking button.
- In the first required field, select the scan icon.
- For example, if your items require serial numbers, this will be the first field that you will see. Other fields may be Package number or Lot number.
- Repeat this process until all item tracking fields contain the corresponding item tracking details.
- When all fields have been entered, select the Save button at the bottom of the screen.
- As Wiise Stocktake has been set up as a blind stocktake, serialised items will show as single stocktake items and can only be counted as a single unit. Follow these steps to complete a stocktake for serialised items.
- You will see a blue Add item tracking button at the bottom of the screen.
- Select the Add item tracking button.
- In the first required field, select the scan icon.
For example, if your items require serial numbers, this will be the first field that you will see. Other fields may be Package number or Lot number. - Scan the corresponding barcode on the item. (For example, scan the serial number of the item when selecting the scan button for serial number in OnTime)
You can also manually enter the tracking details by selecting the field. - Repeat this process until all item tracking fields contain the corresponding item tracking details.
- When all fields have been entered, select the Save button at the bottom of the screen.
- For the next serialised item, select Copy Item under the quantity selector.
- The item will now be copied to a new page. Repeat the process until all serialised items have been counted.
Note: Expiry and warranty item tracking dates are unavailable at this time.
- For non-serialised items, follow the following steps.
-
Count the physical quantity of that item contained within the bin.
-
Use the keypad to enter your count of the items. (You can also use the + or - buttons to adjust the count.)
-
Select anywhere on the screen to exit the keyboard.
-
Select Confirm button to confirm the count.
-
Repeat steps 5-7 until all of the items have been counted and the Completed tab is displayed.
-
Select Back to return to the stocktake list.
-
Select Save to save all completed stocktakes back to Wiise Desktop, or select a new stocktake to continue counting.
-
Congratulations! You have now completed a stocktake.
Can I complete more than one stocktake before sending it?
You do not need to save after completing each count. This may be useful if you are counting in an area that does not have strong reception.
When you have completed the required stocktakes, return to the stocktake list and tap Save.
What happens once I save a stocktake back to Wiise ERP Desktop?
Now that the task has been completed, it has been saved back to Wiise ERP Desktop.
-
On the Physical Inventory Recording, the quantity field and recorded field has been filled in.
-
The complete stocktake has been removed from the to-do list.
-
The stocktake can be completed in Wiise:
-
Search for and open Phys. Inventory Recordings.
-
Select the completed stocktake from the list.
-
Review the stocktake and confirm it is correct.
-
Select Finish in the top menu bar when ready.
-
Select Yes in the pop-up to finish the recording.
-
The stocktake has now been completed.