Overview:
- Learn to manage the Wiise Payroll Setup in Wiise
- Enable Timesheet or Project Costing
Why Manage Wiise Payroll Setup in Wiise?
Update your Wiise Payroll Setup page in Wiise before importing your first pay run to post journals. Doing this will help prevent any errors and ensure that Wiise is ready to process your payroll.
Before you begin
- You can enable either Timesheets or Project Costing, but not both. If Timesheets is already turned on, you'll need to finalise any open timesheet lines before disabling it. Wiise won't let you turn Timesheets off while open lines remain. Once Timesheets is disabled, you can enable Project Costing.
How to Manage Wiise Payroll Setup in Wiise?
- Select Wiise Payroll on your Wiise landing page. Then select Setup.
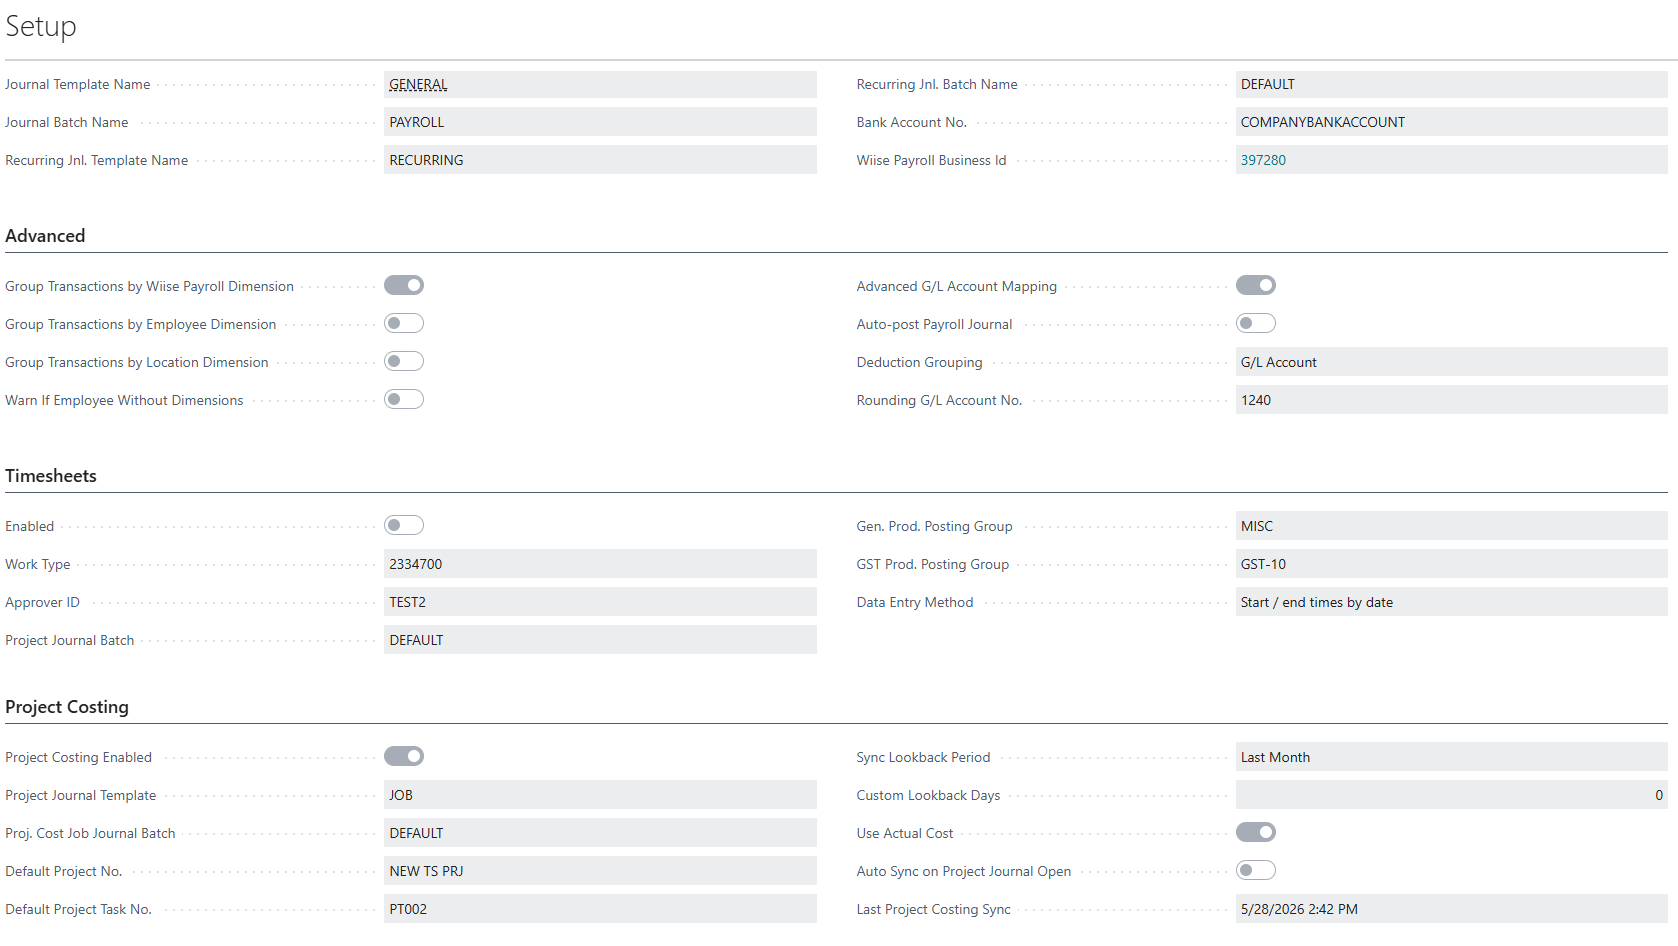
- The Wiise Payroll Setup page displays. The sections consist of General, Advanced, Timesheets and Project Costing. You'll need to fill in the required fields.

- General section:
- Update a Journal Template Name;
- Update a Journal Batch Name. As you'll be generating payroll journals, you can assign a related batch in this field.
Note: A journal batch allows you to group and differentiate collections of journal lines. - Recurring Journal Template Name: Select the journal template you want the month-end leave accruals journal batch to be created in.
- Recurring Journal Batch Name: Select the journal batch you want the collection of journal lines for the calculated month-end leave accruals to be reviewed and posted in.
- Bank Account No.: Enter the bank account that the company’s wages will be paid from.
- Wiise Payroll Business Id: Your unique hyperlinked six-digit payroll file number generated when you register for Wiise Payroll. Select the link to be directed to Wiise Payroll.
- Advanced section:
- Select Group Transactions by Payroll Dimension to enable and sync dimensions between Wiise ERP and Wiise Payroll so that timesheet entries reflect accurate data for payroll processing.
- Select either Group Transactions by Employee Dimension or Group Transactions by Location Dimension based on how you want to organise imported payroll transactions which are set up for reporting.
- Select Warn If Employees Without Dimensions if you want Wiise to let you know when employees don’t have dimensions or information categories.
Note: You can use dimensions to categorise the payroll journal by department or cost centre. Learn more about Employee Dimensions. - Select Advanced G/L Account Mapping for a detailed method of mapping G/L accounts with Wiise Payroll account types.
Note: You set up Advanced G/L account for your business to handle multiple awards. - Select Auto-post Payroll Journal to post Payroll journals automatically after importing.
- Specify the Deduction Grouping using the dropdown menu. Select one of the following grouping methods:
- G/L Account: This is the default option and will group the imported payroll transactions for deductions by G/L Account.
- General section:
-
-
-
- Deduction Category: This option will group the imported payroll transactions for deductions by Deduction Category and will generate a separate journal for each deduction category.
- Specify the Rounding G/L Account No. to post discrepancies when importing pay runs into Wiise.
Note: Discrepancies could occur due to differences in decimal values between systems. Only discrepancies greater than $0 and less than $0.50 appear as an additional journal line for the unbalanced amount.
Note: The deduction grouping method is only available while using simple G/L account mapping. In other words, deduction grouping will not work if Advanced G/L Account Mapping is enabled.
-
- Timesheets section:
- Select Enabled to allow integration between Wiise and Wiise Payroll.
- Work type: You’ll need to copy new work types that you’ve created in Wiise Payroll into Wiise. Please note that if you don’t select the Work Type at this point, the employee will need to select it from their timesheet.
Note: To get an update of your Work Types, select Wiise Payroll from the Wiise landing page. Then, select Work Types. Then, select Action in the ribbon. From the drop-down menu, select Get Work Types. The page displays the updated Work types imported from Wiise Payroll. - In Approver ID, enter the name of the person who’ll approve the timesheets. This will usually be the team manager.
- In Gen. Prod. Posting Group, enter the usual product type that will link to the general ledger account. This will be based on how you’ve set up general posting.
- Finally, in GST Prod. Posting Group, enter the usual GST or VAT type that will link this record’s transactions with the general ledger account. This will be based on how you’ve set up GST or VAT posting.
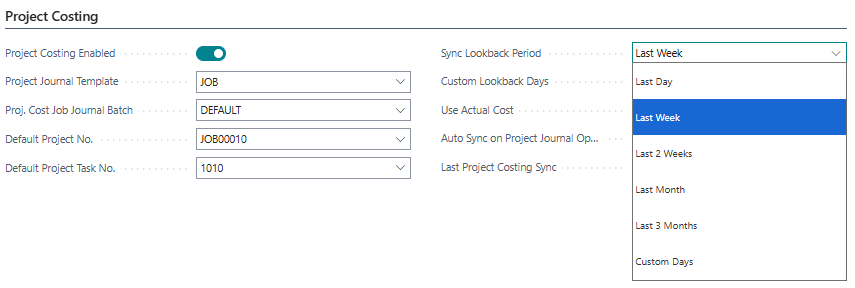
- Project Costing section:
- Project Costing Enabled: Enable this toggle for project costing.
- Project Journal Template: Set the journal template Wiise posts project costs to.
- Proj. Cost Job Journal Batch: Sets the batch within the template that receives synced project entries. DEFAULT works for standard configurations.
- Default Project No.: The project Wiise assigns to synced entries when no project is specified on the source transaction.
- Default Project Task No.: The task line under the default project that receives those entries.
Note: Default Project No. and Default Project Task No. act as a fallback only. Entries that already specify a project and task keep their own values. - Sync Lookback Period: Defines how far back Wiise looks for project activity to sync. Set to a preset range such as Last Week, or choose a custom range to enable Custom Lookback Days.

- Custom Lookback Days: Sets the exact number of days to look back. This field is only editable when Sync Lookback Period is set to a custom option.
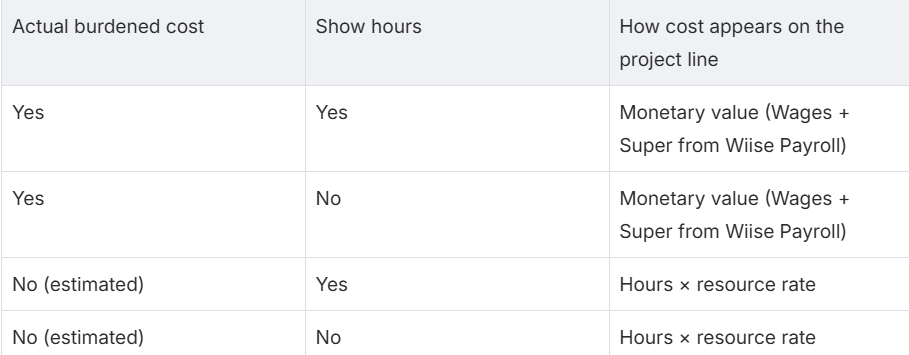
- Use Actual Cost: When enabled, Wiise uses the actual cost from Wiise Payroll. When disabled, Wiise uses the unit cost from the Resource card instead.

- Auto Sync on Project Journal Open.: Runs the sync automatically whenever the project journal opens, so you don't have to trigger it manually.
- Last Project Costing Sync: A read-only timestamp showing when the last sync ran. Use it to confirm the most recent data has been pulled.
-
- You’ve now set up Wiise Payroll Setup.
What’s next?
Find out how to set up Business Settings in Wiise Payroll.
If you have any questions, please reach out to support@wiise.com