The Items/Variants page shows all items and variations in your inventory in one list, grouped by item category. You can view and easily add variants, update prices and barcodes and transfer inventory between your locations. Here's how to get to the Items/Variants page:
- Start from the role centre and select Sales > Items > Process > Items / Variants.
Note: You'll need to assign your items to an Item Category Code to make sure they're visible on the Items/Variants page.
How to add and view items and variants
Each time you open the Items/Variants page, only item categories will be listed. You'll need to load (add) the items to view them.
- To view items within an item category, select the category, then select Getting Started > Load Items.
- To view items and their variants within an item category, select the category then select Getting Started > Load Items & Variants.
- Select the arrow next to the category name to expand the category and view the items.
- You can then select the arrow next to the item name to expand that item and view the variants.
How to view items and variants by location
The Items/Variants page shows items/variants per location and you can choose which locations you want to see. Here's how.
- Select Getting Started > Select Locations.
- Then tick the locations you want to add, then select Close.
- Follow the same steps to remove a location from the Items/Variants page.
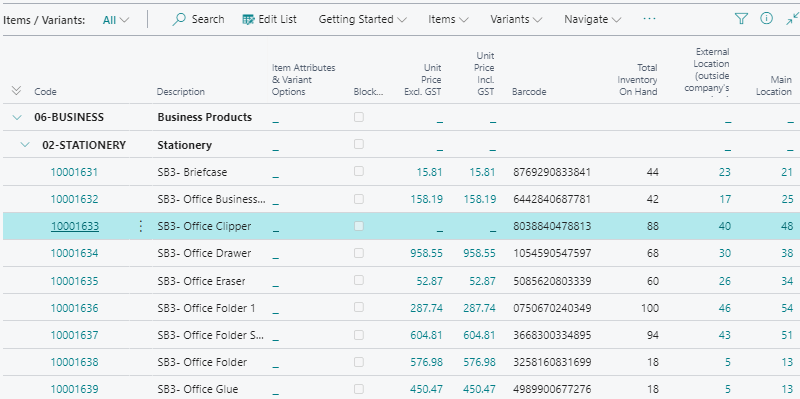
You'll find the following fields on the Items/Variants page.
- Code: This is the Item Category/Item/Variant code.
- Description: This is the name of the Item Category/ Item/ Variant.
- Item Attributes & Variant Options: Select this to create or change attributes and options.
- Blocked: Shows if the item is blocked for sales in Wiise and in related stores.
- Unit Price Excl. GST: View or change the unit price of an item or item variant.
- Unit Price Incl. GST: Shows if the unit price of an item includes GST.
- Barcode: View or change the Barcode/GTIN of an item or item variant.
- Total Inventory on Hand: Shows how many units of an item and variant are in inventory across all locations.
- Locations: Shows how many units of an item and variant are in inventory in each location.
How to set up variant options
To create item variants, you'll need to set up variant options. You can do this from the Items/Variants page. Here are the steps.
- First, find the Item Category on the Items/Variants page.
- Then select the Item Attributes & Variant Options field next to the Item Category.
- A pop-up will appear to select the Options.
- Select the option from the drop-down menu, or select +New to create a new variant option.
- When you're done, select Close.
How to create a new variant option
When you create a new variant option, you'll need to enter a name and values for the option.
For example, if a variant option name is "Size", the variant option values might be "Small, Medium, Large".
Note: Variant options are created at the item category level. Once you've created them, the variant options will be available to all items within the same item category.
How to create variants using all options
You can automatically create item variants for all possible combinations in the variant options. To do this, you'll need to set up the variant options the item category level first.
- First, select the item on the Items/Variants page.
- Then select Items > Create Variants using Options.
- Variants will be automatically created using all combinations of variant options that you've set up on the item category.
How to create a single variant
You can manually create a single item variant using the variant options. To do this, you'll need to set up the variant options on the item category level first.
- Select the item on the Items/Variants page.
- Then select Items > Create Single Variant.
- A pop-up will appear— add the following details:
- Variant Code
- Variant Description
- Variant Option Values
- To finish, select OK. You'll see a new variant created under the item.
How to delete a single variant
You can delete a single item variant on the Items/Variants page.
- First, select the item variant on the Items/Variants page.
- Now select Variants > Delete Variant.
Note: You can only delete an item variant if there are no item ledger entries applied to that variant.
You can see your total inventory on hand and by location on the Items/Variants page. If you want to transfer items and variants from one location to another, here's what you need to do.
How to transfer inventory between locations
- First, make sure you load the items and/ variants (if any exist). To do this, select the Item Category then select Getting Started > Load Items.
- If items contain variants, then select Getting Started > Load Items & Variants.
- Then select the inventory amount hyperlink for the location you want to transfer inventory from.
- The Transfer Order Worksheet will open. Select the inventory quantity you want to transfer to each location.
- When you're finished, select OK. A Transfer Order will be created for your selected inventory and locations. Note: A Transfer Order is created by location for inventory transfers.
- The inventory in Wiise won't be transferred until the Transfer Order is posted. To post the order:
- Go to the search function to find and open the Transfer Orders page.
- Then open the Transfer Order to review it.
- Select Posting > Post to post the Transfer Order. If there are no errors, you'll receive a successful message and the transfer order will be deleted from the Transfer Orders page.
- The inventory in Wiise will now be transferred from one location to another.